
Introduction
Welcome to the official documentation for ForwardBuddy — the most powerful and flexible Telegram message forwarding bot. Whether you're a content creator syndicating posts across multiple channels, a community manager maintaining several groups, or a power user who wants intelligent control over what gets forwarded and how, ForwardBuddy is built for you.
ForwardBuddy automatically forwards messages from one or more source channels or groups to one or more destination channels or groups — in real time, silently, and with complete control over what gets forwarded and how it looks when it arrives.
What Can ForwardBuddy Do?
Here's a quick overview of the key things you can configure with ForwardBuddy:
How It Works (The Big Picture)
ForwardBuddy operates around the concept of Rules. A rule defines:
- One or more Sources — the Telegram channels or groups where the original messages come from. Attach several and the rule becomes an aggregated feed.
- One or more Destinations — the channels or groups where messages should be forwarded to.
- Filters & Settings — conditions that control which messages are forwarded and how they appear.
Once a rule is active, ForwardBuddy listens to your source channel around the clock. The moment a new message arrives, it checks your rule's settings, applies any transformations (like keyword replacements, headers, or filters), and delivers the modified message to all destination feeds. Everything happens in milliseconds.
Subscription Plans at a Glance
ForwardBuddy offers three tiers to match your volume and business requirements:
| Plan | Rules Limit | Sources per Rule | Custom Bots | Key Features Included |
|---|---|---|---|---|
| Free | Up to 5 rules | 3 sources | 1 custom bot | Basic forwarding (limit 200 msg/day), type filtering, feed aggregation |
| Basic | Up to 10 rules | 10 sources | 5 custom bots | Unlimited messages, Whitelists, Blacklists (incl. regex), Keyword Replacements, Delays, Forwarding Hours, Skip Duplicates |
| Pro | Up to 30 rules | 50 sources | 10 custom bots | Edit Mirroring, Header/Footer, Reply Preservation, Photo Watermarks, Own Account forwarding, Clone Channel, Priority support |
Getting Started
This section walks you through everything you need to do to get ForwardBuddy up and running — from opening the bot in Telegram all the way to having your first rule forwarding messages automatically.
-
1Start the Bot
Open Telegram and search for @ForwardBuddyBot, or click the direct launch link: t.me/ForwardBuddyBot. Press Start. The bot will greet you and present the main command menu.
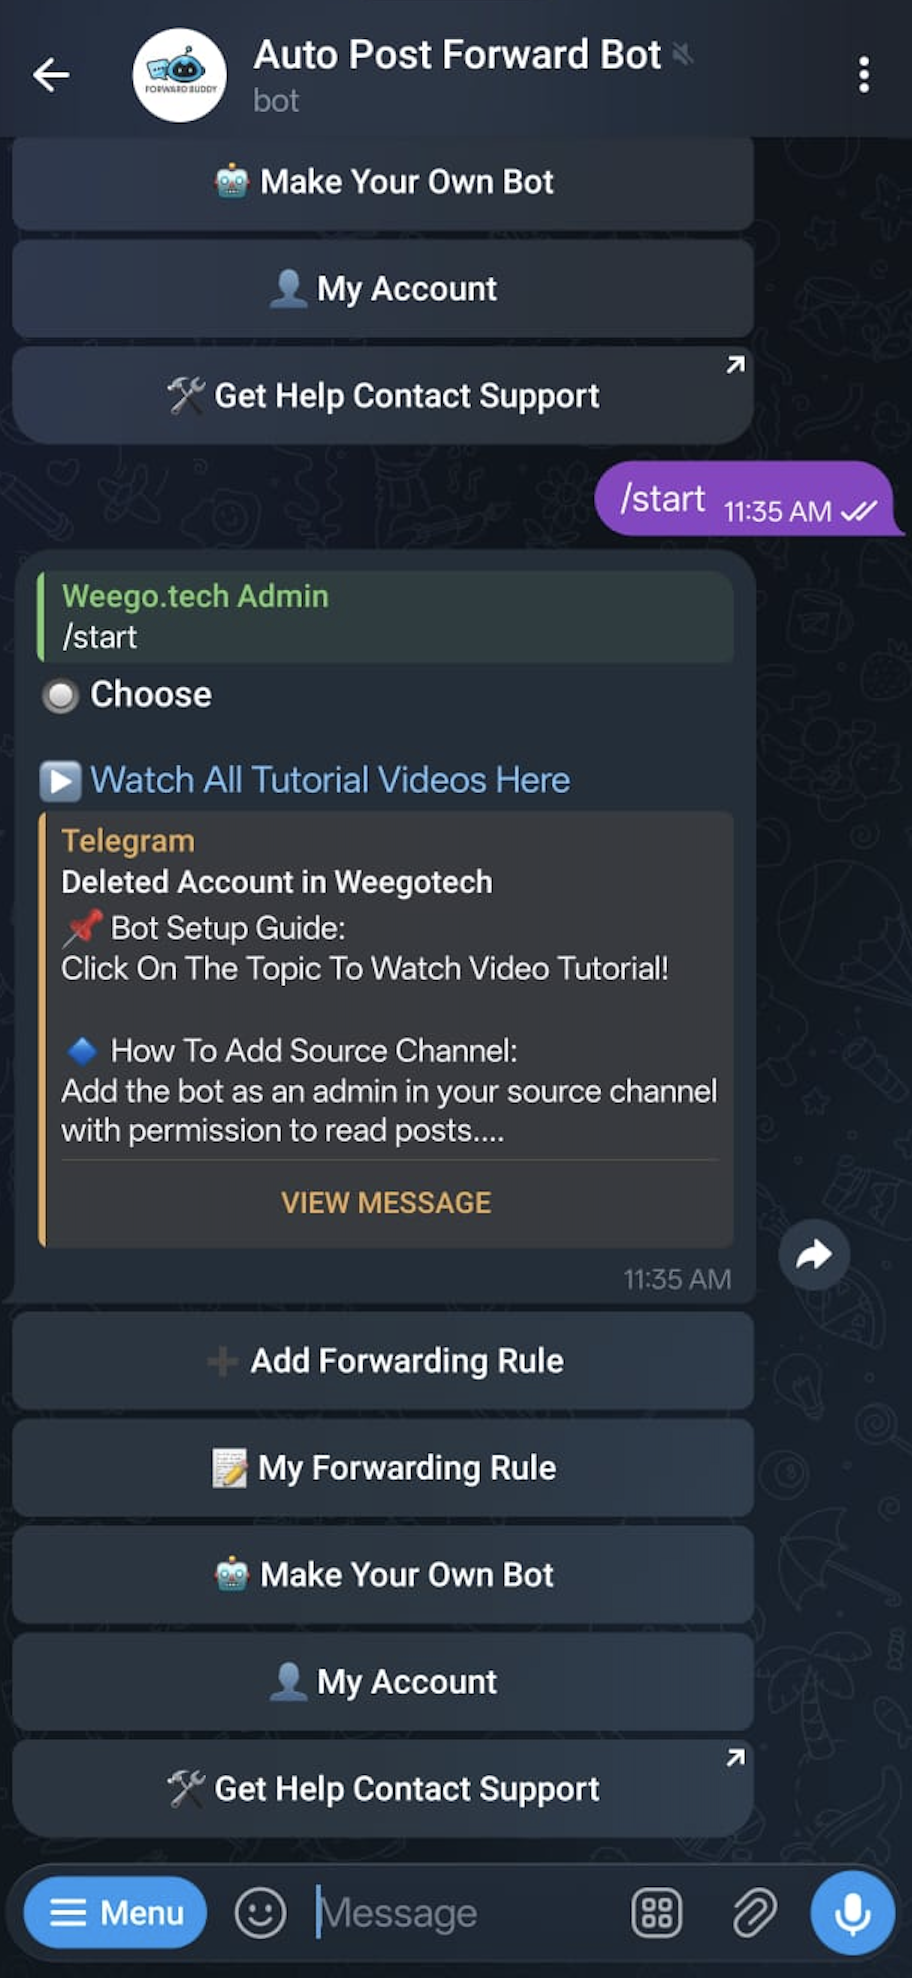 Before you can use the bot, you will be prompted to join a few official ForwardBuddy community channels. This is required to access all features. Simply join them and press the "I've Joined" button to unlock the menu.
 -
2Understand the Main Menu
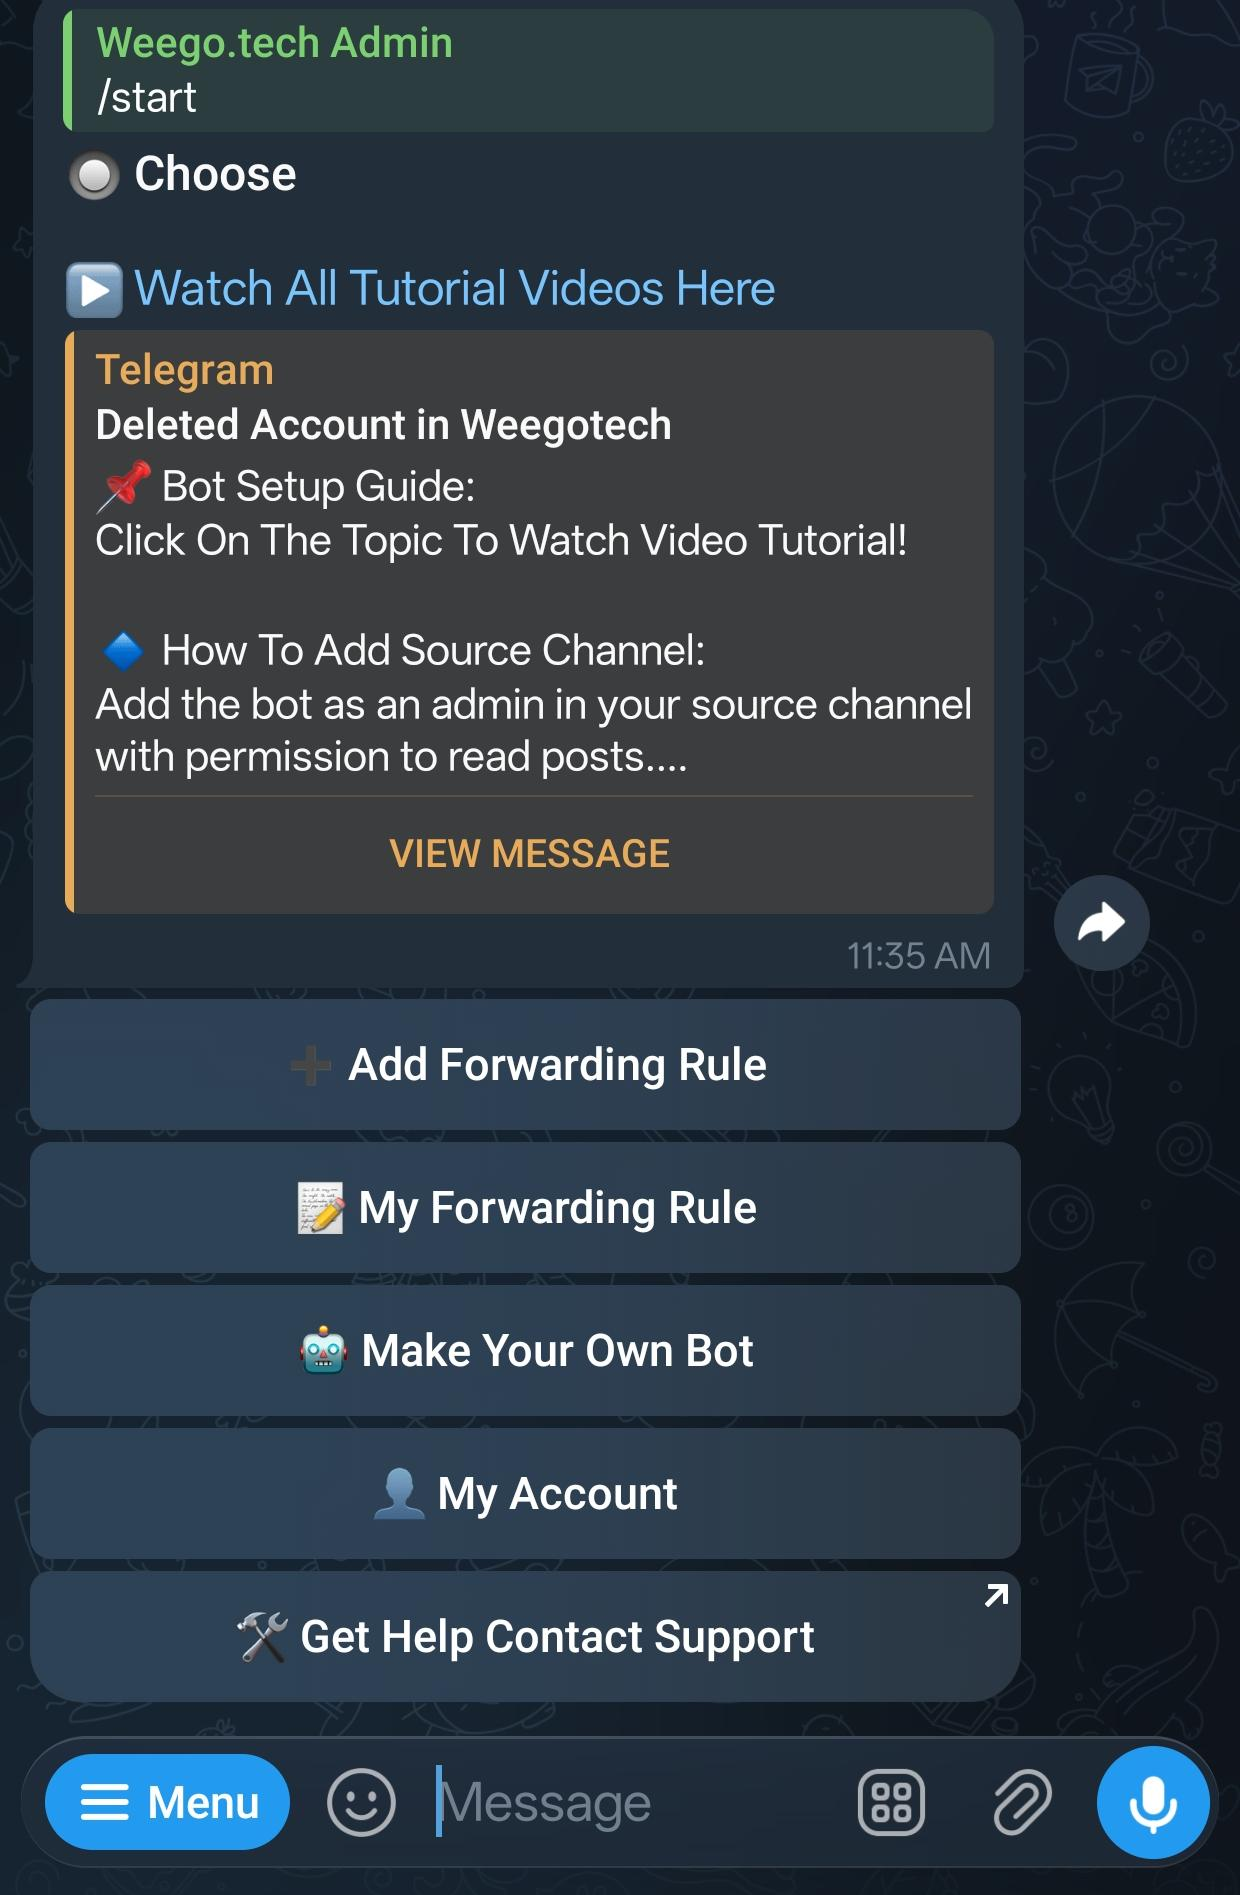
After starting, you'll see the main menu keyboard with the following primary options:
- ➕ Add Rule — Create a new message forwarding flow.
- 📋 My Rules — View, edit, pause, or delete your existing rules.
- 🤖 My Bots — Manage custom BotFather tokens you've added.
- ⬆ Upgrade — View your current subscription status and buy upgraded tiers.
-
3Create Your First Rule & Choose Mode
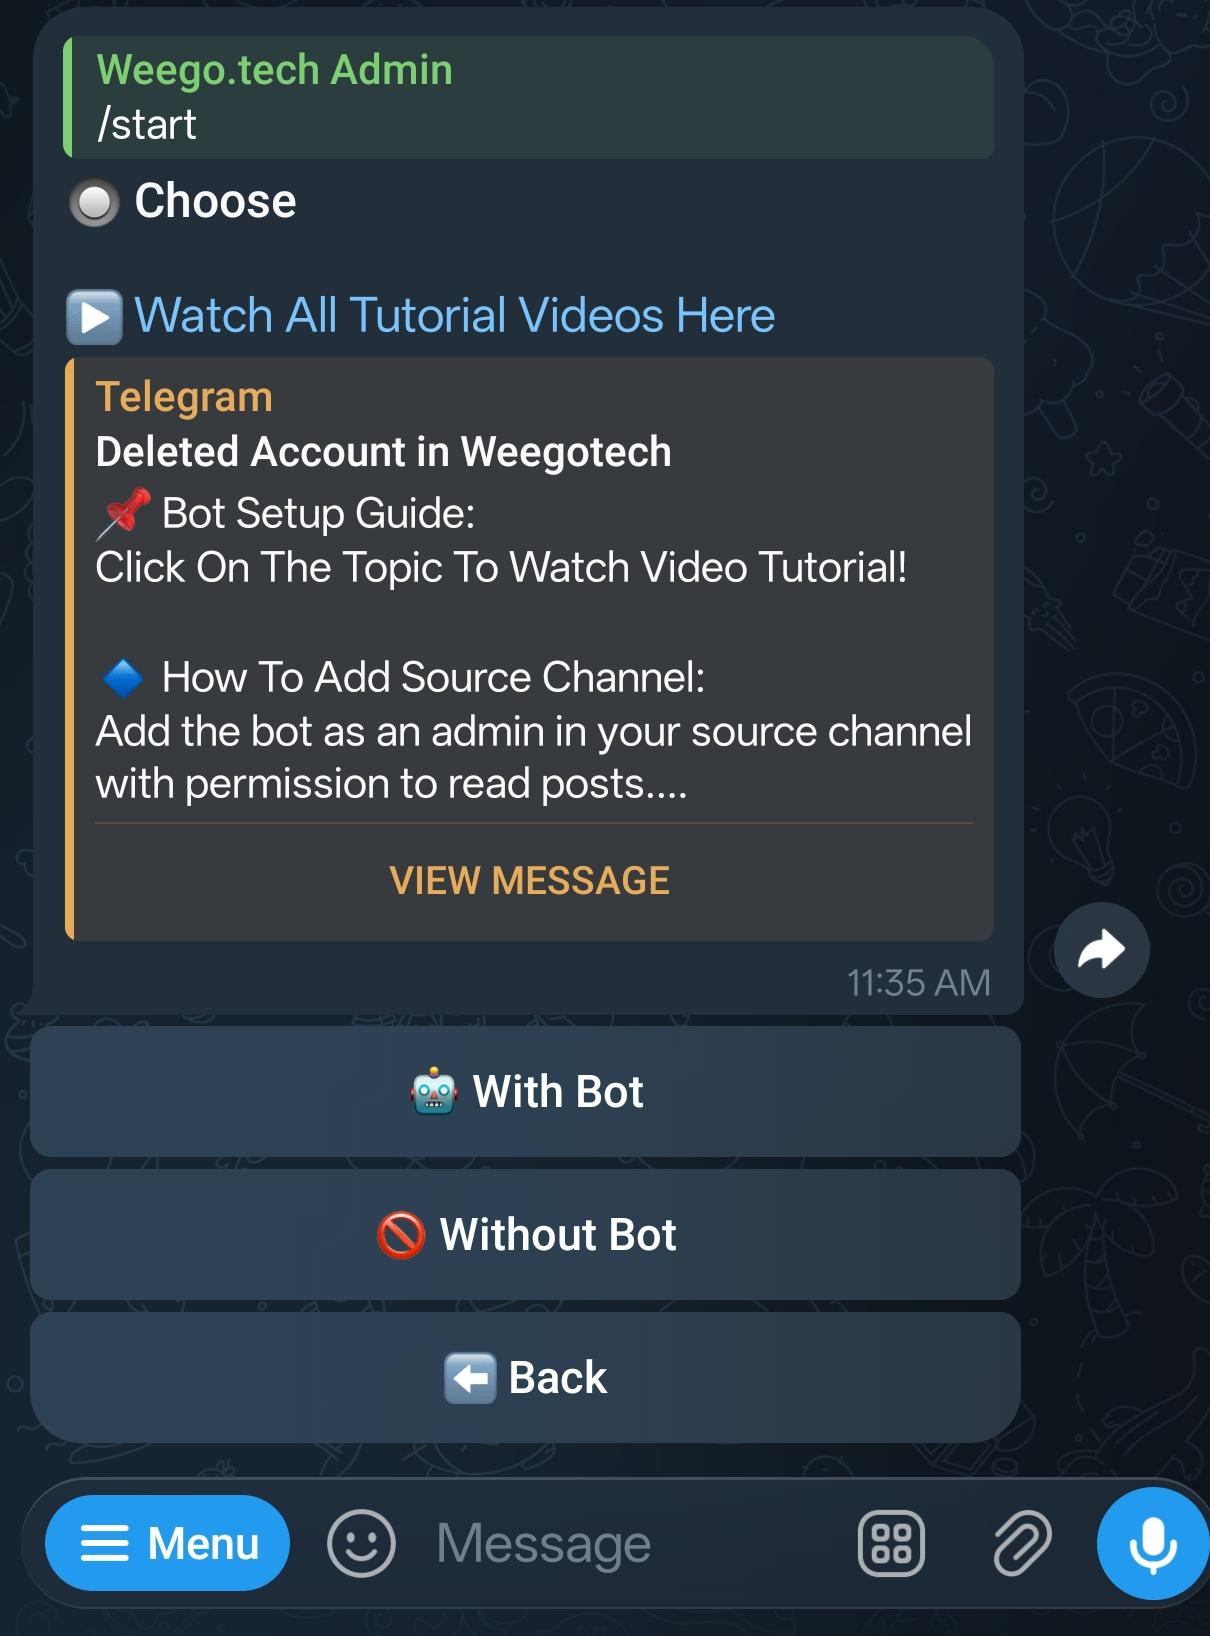
Tap ➕ Add Rule. You will be prompted to select a bot mode for monitoring the source:
Mode Description With Bot You add the bot as an administrator to your source channel/group. Easy to use and available on all plans. Without Bot You provide a channel link, and ForwardBuddy's backend agent account joins on your behalf to monitor posts (Requires Basic or Pro). Useful if you are forwarding from public channels you do not own. Use My Account Your own connected Telegram account does the forwarding — pick source and destination straight from your personal chat list, no bot or helper account needed (Requires Pro + a connected account, see Connect Your Own Account). 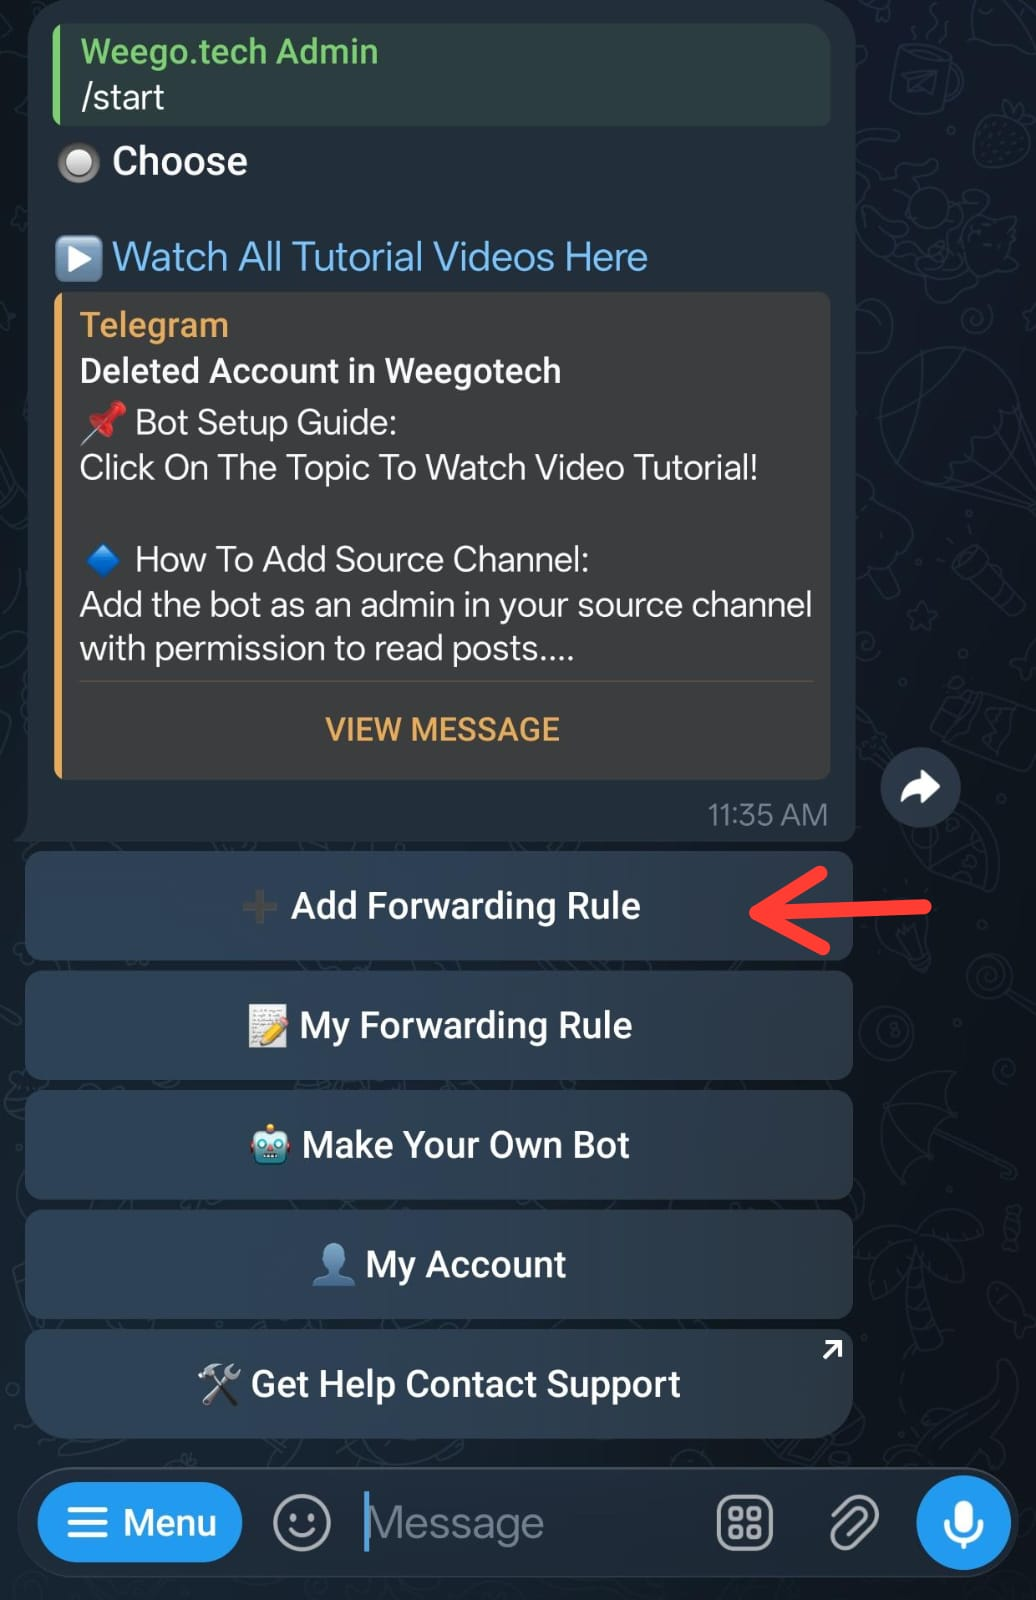
-
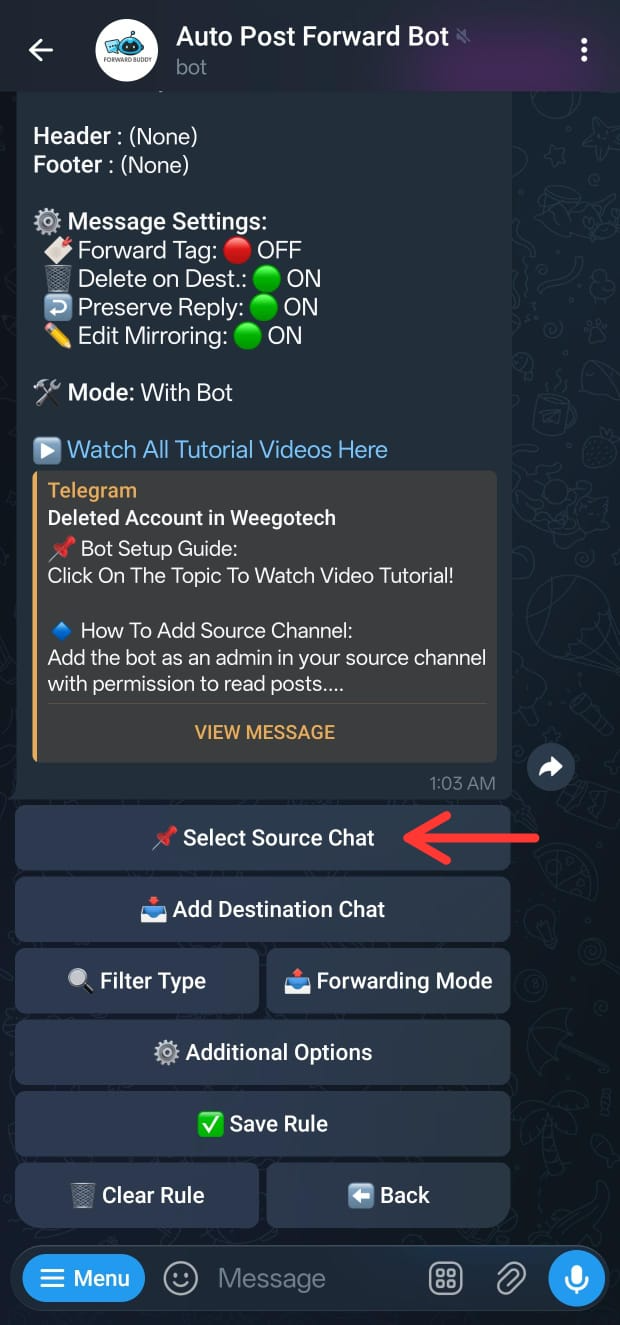
4Set Your Source Channel(s)
Next, you'll assign the Source Channel where original messages are posted:
- If in "With Bot" mode: Tap the "Share Channel" button and select the source channel from your Telegram chat list. Make sure you have already added the bot as an admin of that channel first with read/post messages permissions.
- If in "Without Bot" mode: Simply paste and send the link to the channel (e.g.,
https://t.me/yourchannelor a private invite linkhttps://t.me/+xxxx). ForwardBuddy's silent agent account will join it immediately.
Want one feed built from several channels? Tap 📡 Source Chats → ➕ Add Another Source and repeat for each one — see Multiple Source Chats.
-
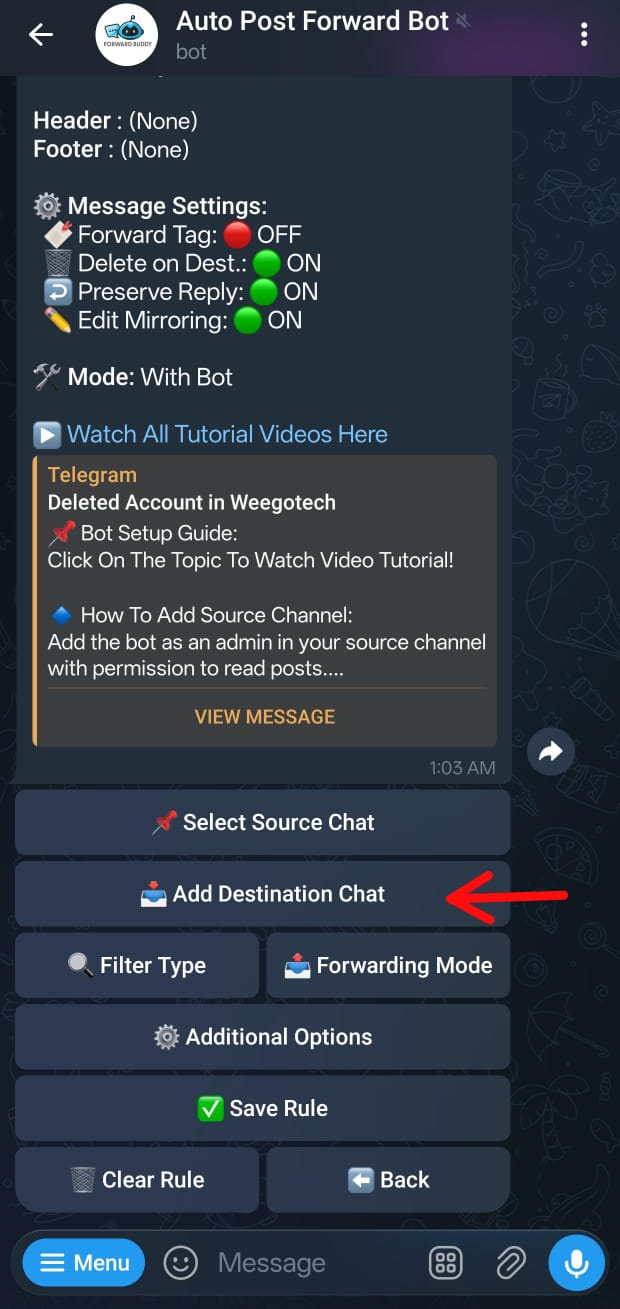
5Add Destination Channel(s)
Tap 🎯 Add Destination. Paste and send the link to the target channel where messages should be sent. You can configure multiple destinations within a single rule; ForwardBuddy will deliver clean copies to all of them simultaneously.
Crucial Step! ForwardBuddy's forwarding bot or agent must be added as an Administrator in the destination channel with "Post Messages" permissions. The bot will ask you to confirm this before saving the rule.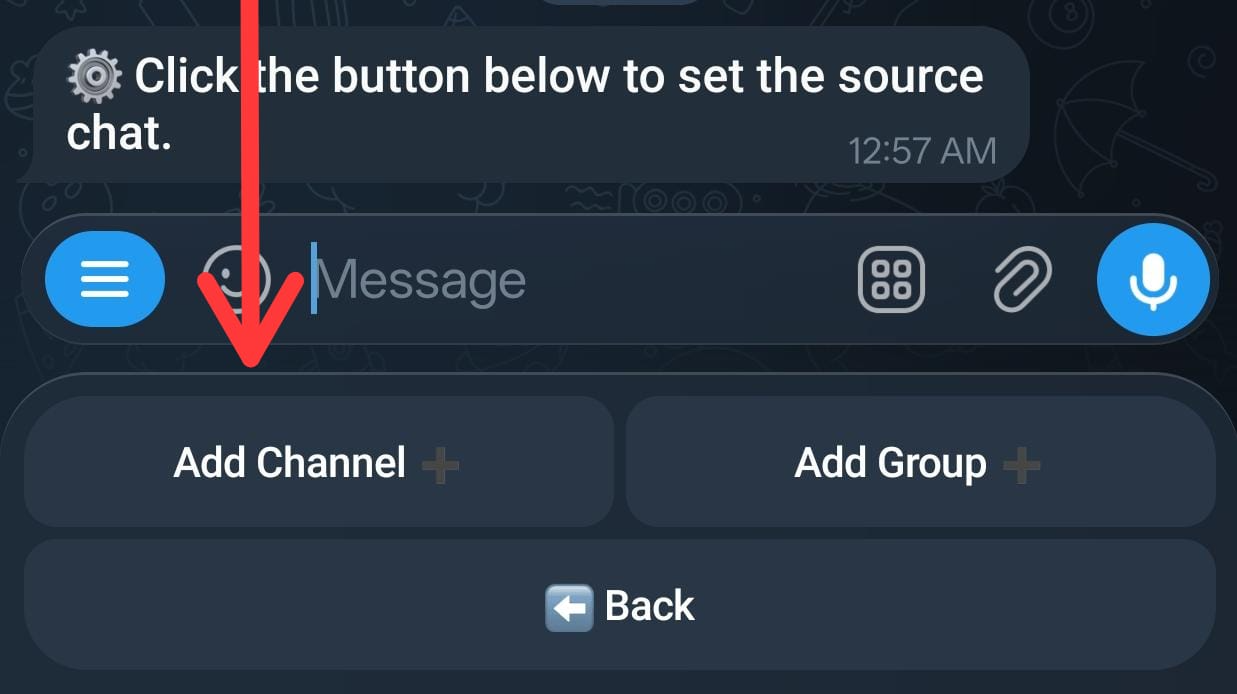
-
6Configure Optional Filters & Settings
Once the source and at least one destination are linked, the bot will show advanced configuration controls:
- 🔽 Filters — Select which message types to pass: All, Text, Photos, Videos, Audio, Documents, Links.
- ⚙ Message Settings — Toggle native Forward tags, Edit Mirroring, Reply Preservation, and Delete on Source.
- ➕ Additional — Set up Whitelists/Blacklists, Keyword Replacements, Delays, Length Caps, Headers/Footers, and Photo Watermarks.
-
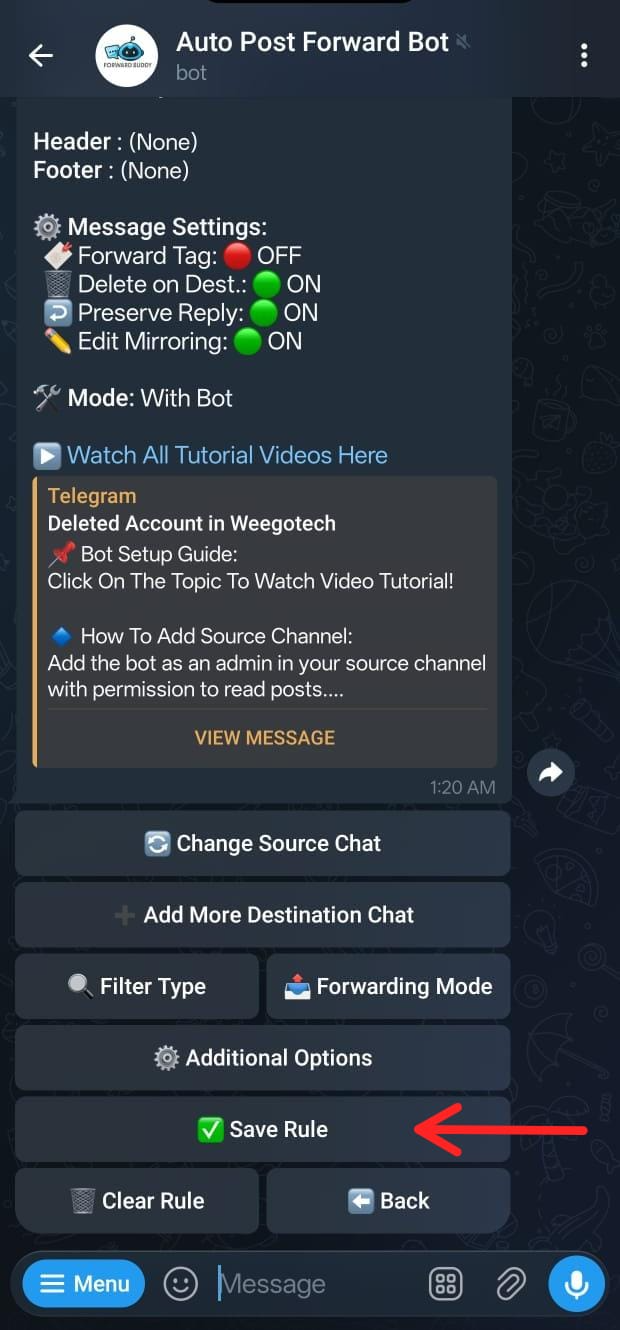
7Save and Activate the Rule
Once you are satisfied, tap the ✅ Save button. Your rule is now instantly active! From this second forward, every matching message posted to the source will mirror automatically to your destination channels.
Bot Command Reference
Everything in ForwardBuddy is reachable from the menu buttons, but these slash commands are handy shortcuts:
| Command | What It Does |
|---|---|
/start |
Starts the bot and shows the main menu. |
/add |
Opens the step-by-step wizard to create a new forwarding rule. |
/rules |
Lists your active forwarding rules for viewing and editing. |
/bots |
Manages your custom bots (Basic or Pro plan). |
/account |
Shows your account details, current plan, and limits. |
/premium |
Shows your subscription status and opens the upgrade menu directly. |
/help |
Help links, including admin contact and documentation. |
/support |
Displays support contact information. |
/docs |
Sends a direct link to this documentation. |
Bot Commands Reference
ForwardBuddy can be controlled via both conversational button keyboards and slash commands. Below is the complete reference of all standard user commands as well as administrative operational commands.
User Commands
These commands are accessible to all users directly inside the chat with @ForwardBuddyBot:
| Command | Description | Deep Linking / Parameters |
|---|---|---|
/start |
Initiates the bot interaction, handles language selection, and opens the main menu. | Supports referral links (/start ref_<id>) and upgrade links (/start upgrade). |
/rules |
Opens the rule management interface to view, configure, pause, resume, or delete your active forwarding rules. | Direct menu jump. |
/add |
Launches the step-by-step interactive wizard to create and set up a new forwarding rule. | Wizard flow. |
/bots |
Opens the custom bot management interface to register or delete your own BotFather bot tokens. | Available on Free, Basic, and Pro. |
/account |
Displays details about your account, Telegram User ID, active subscription plan, expiration countdown, and daily limits. | Account dashboard. |
/premium |
Displays subscription plan details, feature comparison, pricing in your preferred currency, and opens checkout. | Checkout flow. |
/docs |
Opens the full interactive web documentation inside the Telegram Mini App. | Mini App webview. |
/help |
Provides quick help links, troubleshooting steps, and contact links. | Support links. |
/support |
Displays direct contact information for priority customer assistance. | Support contact. |
Admin & Operations Commands
These commands are reserved for administrators managing marketing campaigns and the background Telethon agent worker pool:
| Command | Description | Usage Example |
|---|---|---|
/newcampaign <name> |
Generates a trackable campaign referral link to measure traffic from specific acquisition sources. | /newcampaign telegram_promo |
/campaigns |
Lists all active attribution campaigns and displays real-time user signup conversion statistics. | /campaigns |
/broadcast |
Broadcasts an announcement message to all bot users with interactive delivery progress and cancellation. | /broadcast |
/import |
Bulk-imports Telethon .session files from storage into the active background agent pool. |
/import |
/reassign |
Identifies orphaned rules or disconnected user sessions and automatically rebalances them across healthy agents. | /reassign |
/rename_agents |
Renames pooled agent accounts to natural, human-friendly profile names to keep Telegram identities clean. | /rename_agents |
Multiple Source Chats
A single rule can pull from many source chats at once and merge them into one destination feed. Instead of building five near-identical rules to aggregate five news channels — and re-configuring the same filters, blacklists, and footer in each one — you build one rule, attach all five sources to it, and configure everything a single time.
✅ Available on: All plans (Free, Basic and Pro) — only the number of sources per rule differs.
How Many Sources Can a Rule Have?
| Plan | Source Chats per Rule | Rules |
|---|---|---|
| Free | Up to 3 sources | 5 rules |
| Basic | Up to 10 sources | 10 rules |
| Pro | Up to 50 sources | 30 rules |
Common Use Cases
- News aggregation: Merge a dozen crypto, sports, or job-alert channels into one channel your subscribers actually follow.
- Signal consolidation: Collect calls from several signal providers into a single feed you monitor, with one shared blacklist filtering the noise.
- Backup mirrors: Mirror every channel you run into one private archive channel with a single rule.
- Shared configuration: One set of keyword replacements, one footer, one delay — applied identically to every source in the feed.
Adding Sources While Creating a Rule
- Start a new rule with ➕ Add Rule and set the first source as usual.
- Back on the rule setup screen, tap 📡 Source Chats — the button shows the current count once a rule has more than one, e.g. 📡 Source Chats (4).
- Tap ➕ Add Another Source and supply the next chat exactly the way you supplied the first: share the chat in With Bot mode, paste a link in Without Bot mode, or pick it from your chat list in Use My Account mode.
- Repeat for each channel you want in the feed, then tap Done and save the rule.
Editing Sources on an Existing Rule
- Open 📋 My Rules and select the rule.
- Tap 📡 Edit Source Chats. You'll see every attached source with its name, chat ID, and username.
- Tap ➕ Add Another Source to attach one more, or the ❌ beside a source to detach it.
Labelling Where Each Message Came From
When several channels feed one destination, readers can't tell which one a given post came from. Turn on 🏷 Show Source Name under ⚙ Message Settings and every forwarded message is prefixed with the originating chat's name:
📡 Crypto Daily News

BTC breaks $80,000 as ETF inflows accelerate...
The label sits above your header, so it works alongside Header & Footer rather than replacing it. The toggle only appears once a rule has more than one source — with a single source every message would carry the same label. Unlike Header & Footer, source labelling is not Pro-only; it's available on every plan that can aggregate.
Things Worth Knowing
- Settings are shared: Filters, whitelists, blacklists, keyword replacements, delays, forwarding hours, skip-duplicates, headers, footers, and watermarks apply to every source in the rule. If one source needs different treatment, give it its own rule.
- Multi-source rules are marked in the list: In 📋 My Rules, an aggregated rule shows a
+Nsuffix (e.g. 📜 News Feed +4) so you can spot it instantly. - Skip Duplicates gets more useful: Aggregated feeds frequently receive the same story from several channels within minutes. Enabling Skip Duplicates on the rule means your readers see it once.
- One source can back several rules: The same channel may be a source in multiple rules — for example, one rule forwarding everything to your archive and another forwarding only photos to your public channel. See Managing Your Rules.
Message Filters
Message Filters give you granular control over what kinds of media and content types get forwarded to your target channels. Instead of blindly cloning everything that gets posted in a source, you can instruct ForwardBuddy to only pass through the content structures that matter to your audience.
✅ Available on: All plans (Free, Basic, Pro)
Why Use Filters?
Many channels post a mix of content — announcements, files, promotional link cards, voice notes, and memes. But your destination channel might only need a specific slice of that. Filters give you a clean way to separate what you want from what you don't, without modifying the content itself. Real-world examples include:
- A trading signals channel that only cares about clean, text-based signals, blocking charts or PDF attachments.
- A media gallery channel that only mirrors Photos and Videos, discarding text posts.
- A news aggregator channel that only forwards articles containing hyperlinks.
Available Filter Types
ForwardBuddy supports seven core filter types. Here is exactly how each type is identified and evaluated by the bot:
🔘 All (Default Preset)
Forwards every single incoming message, regardless of structural type. This is the default setting when you create a new rule, making it a true mirror of the source channel. Selecting individual filters while "All" is active is not additive — it overrides the "All" preset with that specific selection.
📝 Text Filter
Forwards messages containing plain text with no attached media. The message must contain a text body, and have no photo, video, audio, document, or voice attached. Photos with captions are classified as Photo messages and will be blocked by the Text filter.
✅ Forwarded → "The market opened 2% higher today. Analysts expect..."
✅ Forwarded → "Reminder: Server maintenance at 3:00 PM UTC."
❌ Blocked   → [Photo] with caption "Market update chart"
❌ Blocked   → [PDF File] "Q3 Report.pdf"
🖼️ Photo Filter
Forwards messages where the primary content is an image or photo. This includes standard images sent directly as photos (compressed by Telegram). It does not include stickers or images sent as uncompressed document files.
Album (Media Group) behavior: If multiple photos are uploaded together as a single album, the entire album is treated as one Photo message. Enabling the Photo filter will forward the complete album.
🎬 Video Filter
Forwards messages containing inline playable videos. This does not include round video notes or video files sent as uncompressed documents.
🎵 Audio Filter
Forwards messages where the content is an audio track (recognized by Telegram as music and displayed with a media player, showing artist and title details). This does not include microphone voice recordings (which are handled dynamically under the Audio routing tier) or audio files sent as uncompressed documents.
📄 Document Filter
Forwards messages containing uncompressed files. This is the broadest category. It captures any file that Telegram cannot natively play as media, as well as documents (.pdf, .docx, .zip, .apk, .exe) and media sent explicitly via "Send as File".
🔗 Link Filter
Forwards messages containing at least one URL. The link can be a raw URL (e.g., https://example.com) or an inline hyperlink embedded in text. The Link filter only evaluates the main text body — links inside media captions are not evaluated under this filter.
How Filters Work Together (Evaluation Flow)
Every incoming message is checked against the filter list before any other processing happens. If the message type does not match your active filters, it is silently dropped.
Filter vs. Whitelist/Blacklist
These two systems operate independently and in sequence. A message must pass both checks to be forwarded:
| System | Filter Mechanism | Evaluation Level |
|---|---|---|
| Message Filters | Checks the structural type (photo, text, video, link, document, etc.) | Structure-level |
| Whitelist & Blacklist | Checks the words and phrases inside the text body/caption | Content-level |
How to Configure Filters
- Open 📋 My Rules in the bot and select the rule you want to edit.
- Tap 🔽 Filters.
- You will see a row of toggle buttons for each content type. Highly active items are highlighted.
- Tap a type to enable it. Tap it again to disable it.
- Tap Back when you're done — settings are saved automatically.
Whitelist & Blacklist
The Whitelist and Blacklist features give you keyword-based control over which messages get forwarded. Use them to build intelligent filters that scan the actual text and captions inside a message before deciding whether to dispatch it.
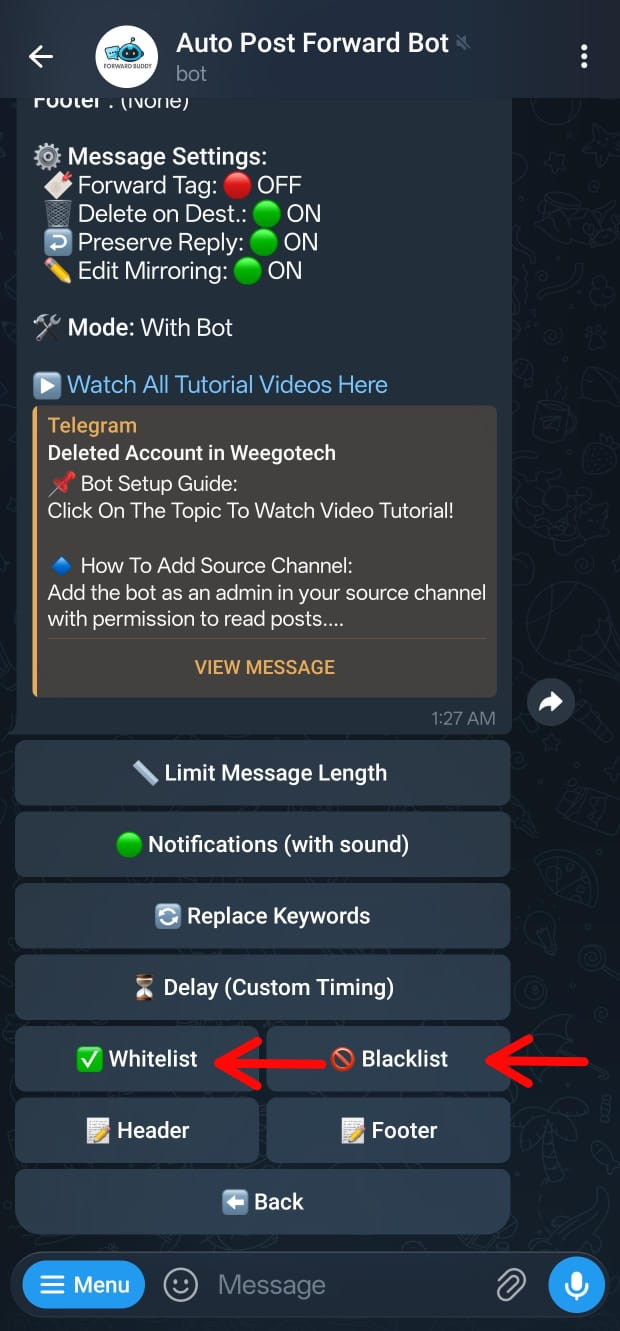
✅ Available on: Basic and Pro plans | ❌ Free Plan: Visible but bypassed with alert notifications.
What's the Difference?
| Feature | Logic | Effect |
|---|---|---|
| Whitelist | Allow only matching posts | A message is forwarded only if it contains at least one of your whitelisted keywords. |
| Blacklist | Block matching posts | A message is blocked and discarded if it contains any of your blacklisted keywords. |
Whitelist
When a Whitelist is configured on a rule, ForwardBuddy evaluates every message text and media caption. If at least one of your whitelisted keywords or phrases is found, it is approved. If none of the whitelisted terms are found, the message is skipped.
How to Set Up the Whitelist:
- Open 📋 My Rules and select your rule.
- Tap ➕ Additional → Whitelist.
- Tap ➕ Add and send the keywords you want to allow. You can enter one per line, or separate them by commas.
- Tap ➖ Remove to delete any keywords from the active list.
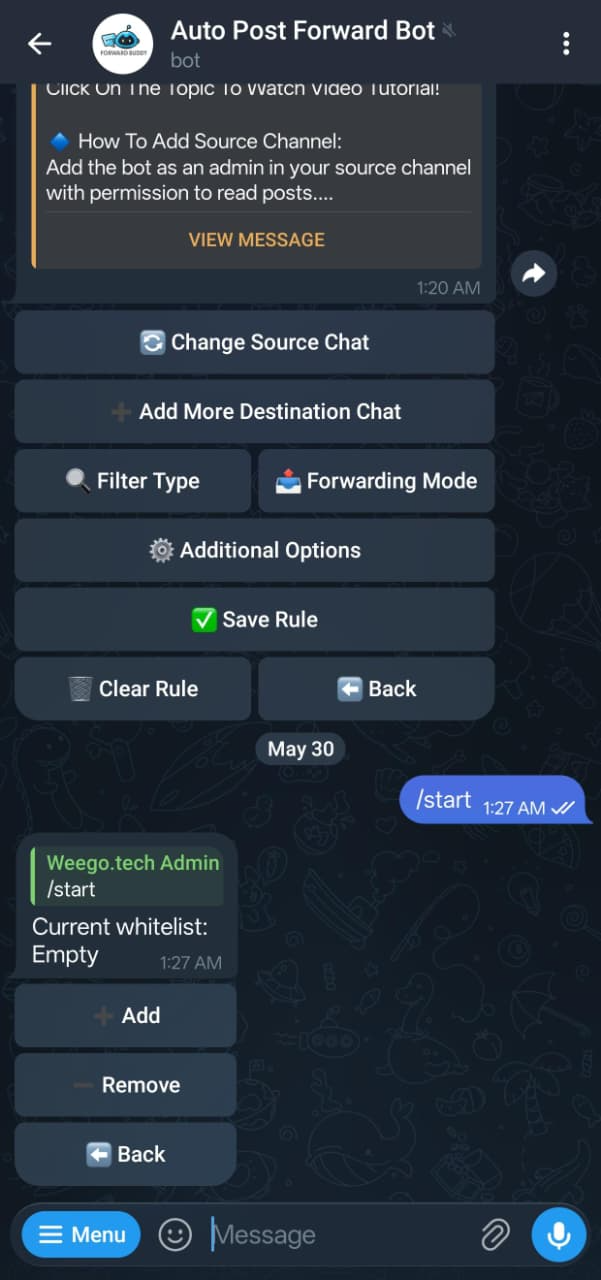
Bitcoin, Ethereum
crypto update
market rally
💡 Pro Tip: Keyword matching is case-insensitive. Adding bitcoin will also match Bitcoin, BITCOIN, and bitCoin. Matching is also substring-based: a keyword of coin will match a message containing Bitcoin or coincidence.
Regex Patterns (Advanced)
Both the Whitelist and Blacklist accept full regular expressions alongside plain keywords. Wrap a pattern in forward slashes — /pattern/ — and ForwardBuddy will treat it as a regex instead of a plain substring match. Matching is case-insensitive.
/\b(BTC|ETH|SOL)\b/        → matches whole-word coin tickers only
/₹\s?\d\d\d+/              → matches rupee amounts of ₹100 or more
/t\.me\/\w+/               → matches any Telegram invite link
/^BREAKING/                → matches messages that START with "BREAKING"
You can freely mix plain keywords and regex entries in the same list:
bitcoin, /\bETH\b/, market rally- No commas inside patterns — the comma is the keyword separator, so a pattern containing a comma will be split into two broken entries.
- Invalid patterns are rejected at input time — if a pattern doesn't compile, the bot tells you exactly which entries failed so you can fix and resend them. Nothing invalid is silently saved.
- Plain keywords (without slashes) continue to work exactly as before — simple case-insensitive substring matching.
Blacklist
When a Blacklist is configured, ForwardBuddy scans incoming messages for the presence of your blocked words or phrases. If a match is found, the message is immediately blocked and discarded. This is extremely useful for filtering out spam, advertisements, competitor mentions, or irrelevant updates.
How to Set Up the Blacklist:
- Open 📋 My Rules and select your rule.
- Tap ➕ Additional → Blacklist.
- Tap ➕ Add and enter the keywords to block (separated by lines or commas).
- Tap ➖ Remove to delete entries.
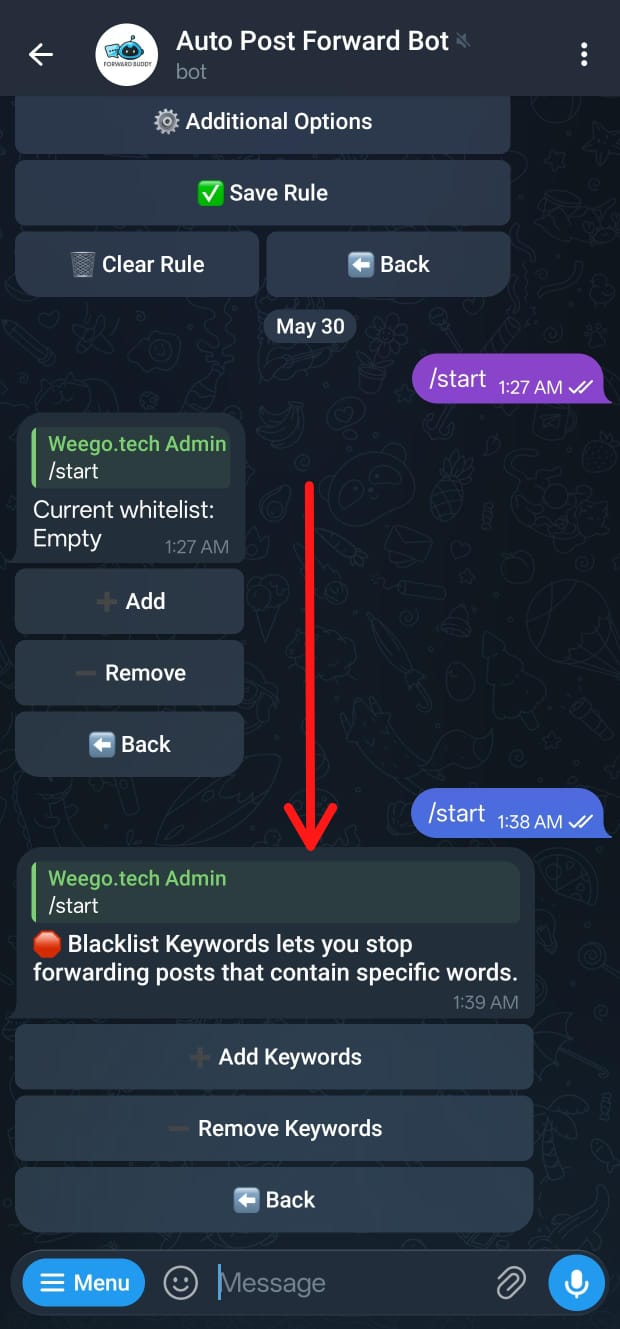
promo, discount
referral code
limited offer
Using Both Together
Whitelist and Blacklist filters can be active on the same rule. When a new message arrives, they are evaluated in this strict order:
- Whitelist check first — Does the message contain a whitelisted keyword? If not, skip it.
- Blacklist check second — Does the message contain a blacklisted keyword? If yes, block it.
A message must satisfy the whitelist filter AND not trigger the blacklist to be successfully forwarded.
Keyword Replacement
The Keyword Replacement feature allows you to automatically swap out specific words, names, links, or phrases in a message before it is forwarded to your destination feed. This is one of the most powerful tools for content white-labeling, rebranding, and automated curation.
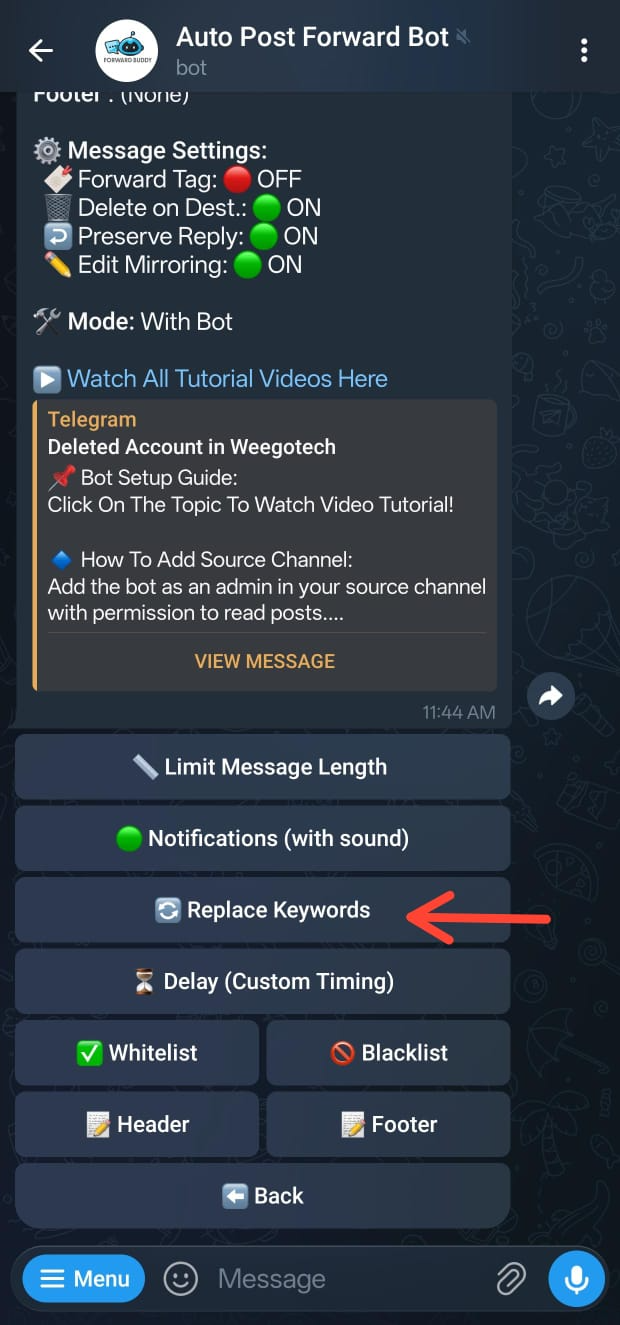
✅ Available on: Basic and Pro plans | ❌ Free Plan: Visible but skipped with notifications.
What Is It Used For?
- White-Label Rebranding: Automatically replace a competitor's channel handle or name with your own.
- Localization & Tone: Swap out slang or terms that don't fit your target audience.
- Privacy Protection: Automatically strip out or mask personal phone numbers, links, or developer credentials.
- Curation: Fix frequent typos or translate specific phrases from the source automatically.
How It Works
You define a list of "find ➔ replace" pairs in the bot. When a message arrives from the source, ForwardBuddy scans the text body (and caption for media messages) and replaces every occurrence of the "find" term with the "replace" term. The modified text is then sent to the destination. Replacement runs before headers or footers are appended, so your header/footer text is not affected by replacement rules.
How to Configure Keyword Replacement
- Open 📋 My Rules and select the rule you want to edit.
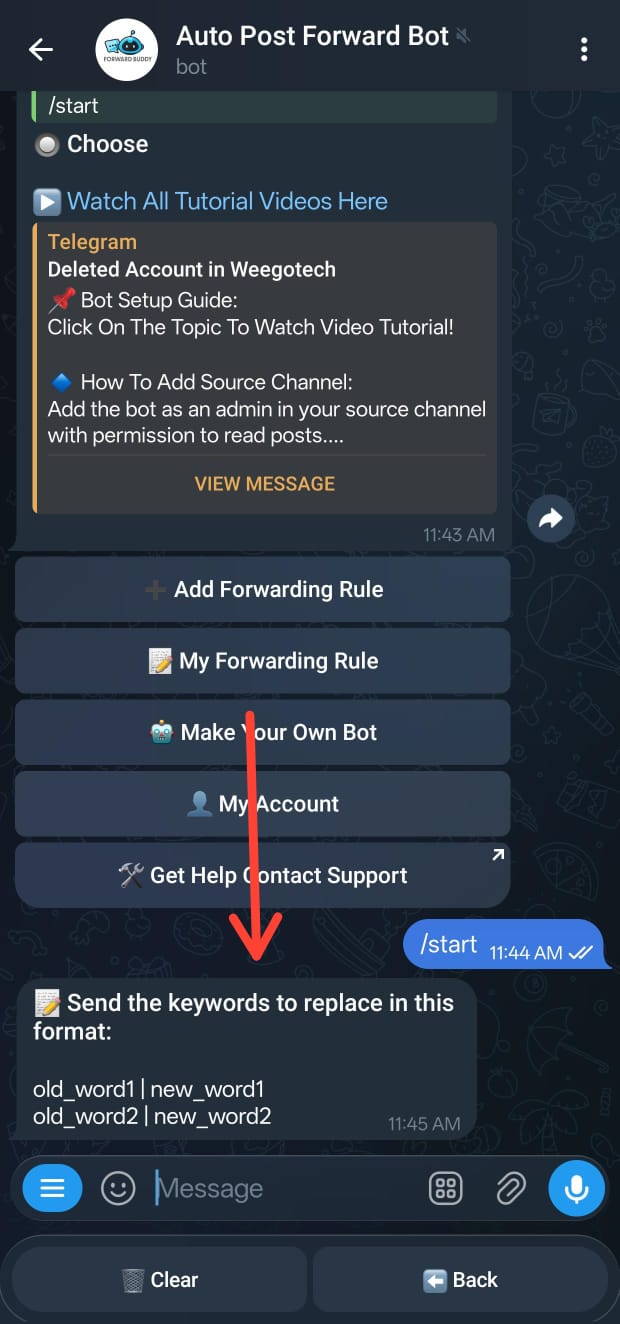
- Tap ➕ Additional → Replace.
- Send your replacement pairs to the bot using the strict format:
old word ➔ new word(one pair per line).
@OriginalChannel → @MyChannel
Buy Now → Learn More
crypto → digital assets
Replacing with Empty (Deletion)
To completely strip a word or phrase from a message without replacing it with anything, simply leave the right side of the pair empty:
[Advertisement] →
unwanted phrase →- Case Sensitivity: Unlike keyword filters, Keyword Replacement is case-sensitive. A rule for
Bitcoinwill not replacebitcoin. You must add separate lines for both if needed. - Mode Limit: Keyword Replacement only works in "Without Tag" forwarding mode. Telegram does not permit bots to alter text in native tagged forwards.
Delays
The Delay feature lets you add a custom waiting period between when a message is posted in the source channel and when it is forwarded to your destination feed. This gives you precise timing control over your content delivery.
✅ Available on: Basic and Pro plans | ❌ Free Plan: Ignored (forwarded immediately).
Common Use Cases for Delays
- Exclusive Preview Periods: Give your premium paid subscribers a 30-minute head start in your main channel before ForwardBuddy dispatches the content to a wider free channel.
- Buffer Recall Window: Set a 5-minute delay. If a typo or mistake is posted in the source, you can delete or correct it in the source channel before the bot forwards it, giving you a functional recall safety net.
- Content Spacing: Space out forwarding items to prevent overwhelming your audience with a sudden burst of multiple posts in a row.
- Anti-Scraping: Add a delay to prevent other automated bots from instantly scraping and plagiarizing your channel contents the second you hit publish.
How It Works
The moment a message is posted in the source, ForwardBuddy pauses and holds it in its secure background queue for the designated number of seconds. Once the countdown expires, it applies any filters or keyword replacements and delivers the message to all destinations simultaneously.
Note: The delay applies rule-wide. If your rule has multiple destinations, the message waits the same delay before being sent to all of them.
How to Set a Delay
- Open 📋 My Rules and select your rule.
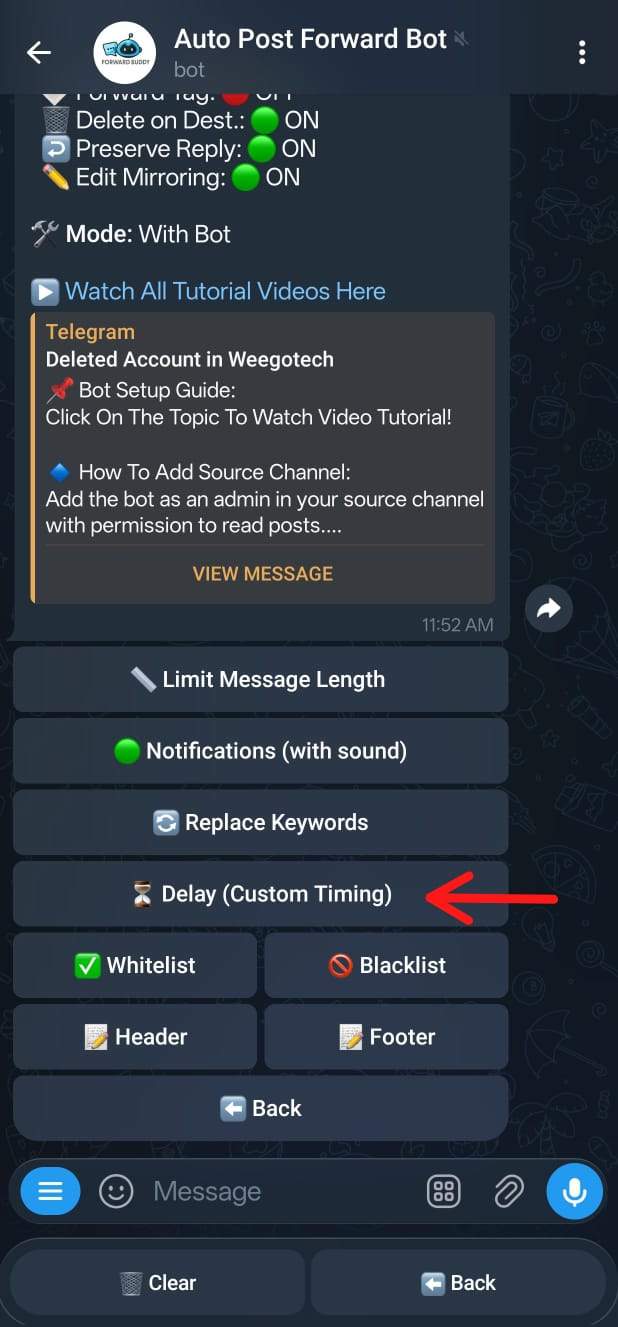
- Tap ➕ Additional → Delay.
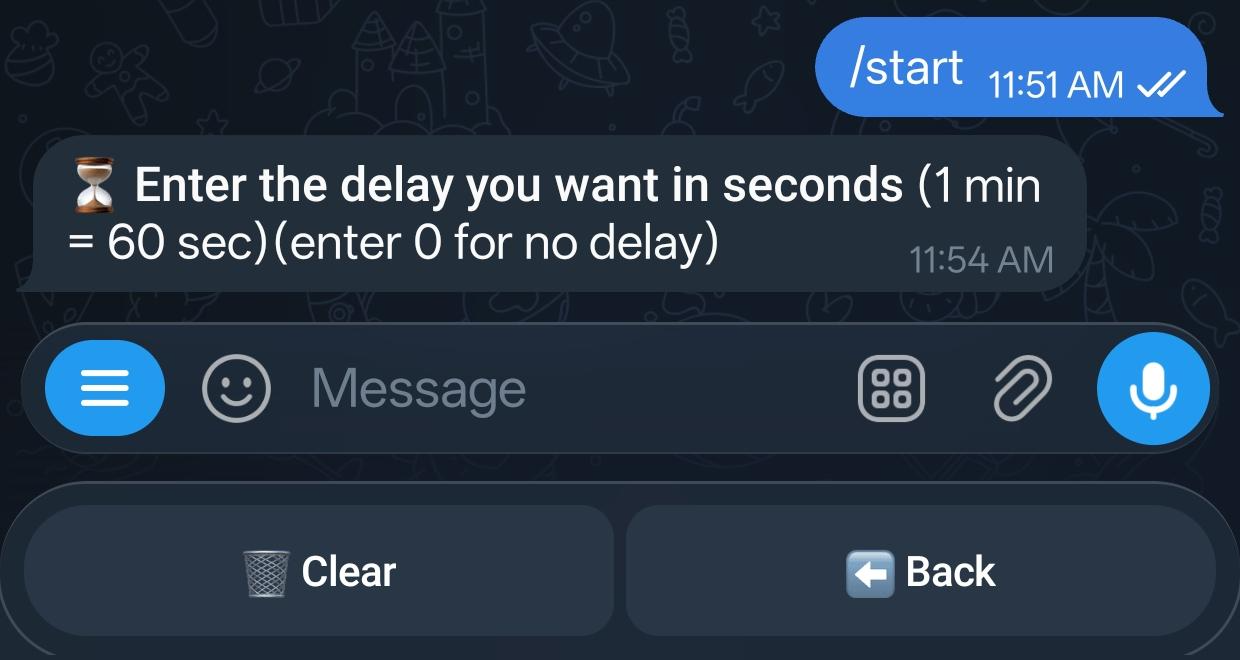
- Enter your desired delay as a whole number in seconds. Send it to the bot.
- To remove a delay and reset to instant forwarding, enter
0when prompted.
| Desired Delay | Input Value to Send |
|---|---|
| 30-second delay | 30 |
| 5-minute delay | 300 |
| 1-hour delay | 3600 |
| 24-hour delay | 86400 |
Forwarding Hours
The Forwarding Hours feature lets you restrict a rule so it only forwards messages during a specific window of the day. Messages posted in the source outside your configured hours are silently skipped — they are not queued or delivered later.
✅ Available on: Basic and Pro plans | ❌ Free Plan: Locked.
Common Use Cases
- Business-Hours Feeds: Only forward updates to a corporate or client-facing channel between 9:00 and 18:00 so subscribers are never pinged at night.
- Audience Time Zones: Your source posts around the clock, but your destination audience is only active in the evening — forward only during their peak hours.
- Night-Only Digests: Use an overnight window like
22-6to run quiet late-night syndication.
How It Works
You define a start hour and an end hour (in 24-hour format, Indian Standard Time — IST). When a new message arrives from the source, ForwardBuddy checks the current time first:
- If the current hour is inside your window, the message continues through the normal pipeline (filters, replacements, delays, and so on).
- If the current hour is outside your window, the message is skipped entirely.
22-6 means forwarding is active from 10:00 PM through 6:00 AM.
How to Set Forwarding Hours
- Open 📋 My Rules and select your rule (or configure it while creating a new rule).
- Tap ➕ Additional → 🕒 Forwarding Hours.
- Send the window as
start-endusing hours from 0 to 23 — for example9-18. - To remove the window and forward at any time again, tap the 🗑️ Clear button when prompted.
| Desired Window | Input Value to Send |
|---|---|
| Office hours (9 AM – 6 PM IST) | 9-18 |
| Evenings only (6 PM – 11 PM IST) | 18-23 |
| Overnight (10 PM – 6 AM IST) | 22-6 |
Skip Duplicates
The Skip Duplicates filter stops the same content from being forwarded twice. When enabled on a rule, ForwardBuddy remembers what it recently forwarded and silently drops any repeat of the same message within a 24-hour window.
✅ Available on: Basic and Pro plans | ❌ Free Plan: Locked.
Why Use It?
- Repetitive Sources: Many channels re-post the same promo, signal, or announcement several times a day. Your destination gets it once.
- Multi-Admin Sources: Different admins occasionally post the same content minutes apart — duplicates are caught automatically.
- Cleaner Feeds: Subscribers never see the same photo or message twice in a row, keeping your channel professional.
How Duplicates Are Detected
ForwardBuddy builds a content fingerprint of every message it forwards, based on:
- The text or caption of the message.
- The unique file identity of any attached media (photo, video, document, audio, or voice) — so the same image re-posted is recognized even if Telegram re-uploads it.
If a new message in the source matches a fingerprint the rule already forwarded within the last 24 hours, it is skipped. Albums (media groups) are fingerprinted as a whole. Detection is tracked per rule — the same content arriving through a different rule is unaffected.
How to Enable Skip Duplicates
- Open 📋 My Rules and select your rule (or configure it while creating a new rule).
- Tap ⚙ Message Settings.
- Toggle 🧬 Skip Duplicates to ON.
Edit Mirroring
Edit Mirroring keeps your syndicated channels in absolute, seamless sync. When you edit an active post in your source channel, ForwardBuddy automatically intercepts the update event and edits the corresponding forwarded copy in the destination channels in real time.
✅ Available on: Pro plan only | ❌ Free or Basic Plans: Locked and bypassed.
Why Does This Matter?
Without Edit Mirroring, any typo corrections, price updates, signal adjustments, or announcement changes made in the original channel are never reflected in your forwarded feeds. Readers in the destination will continue to see outdated or incorrect information, which can break trust or cause severe operational confusion. With Edit Mirroring, what you see in the source is always exactly what the destination displays.
How It Works
ForwardBuddy maintains a secure, local Message Map database. For every post forwarded, it logs the relationship: Source Message ID ➔ Destination Message ID. The second an edit is made in the source:
- ForwardBuddy looks up the corresponding message in the target destination.
- It applies any rule-specific Headers, Footers, and Blacklists to the newly updated text.
- It executes an edit command on the target message, updating it silently without triggering a new push notification.
What Gets Updated on an Edit?
| Content Block | Updated? | Details |
|---|---|---|
| Message Text | ✅ Yes | Updates in place immediately. |
| Media Caption | ✅ Yes | Captions on photos, videos, and files update in place. |
| Photos/Videos/Files | ❌ No | Telegram's core platform API does not allow changing the media attachment type or file payload of an already sent message. Only caption text can be updated. |
| Headers & Footers | ✅ Yes | Automatically re-applies your custom headers and footers to the edited text. |
| Blacklist check | ✅ Yes | If the edited text now contains a blacklisted keyword, the forwarded copy in the destination is deleted to prevent violations. |
How to Enable Edit Mirroring
- Open 📋 My Rules and select your rule.
- Tap ⚙ Message Settings.
- Toggle Edit Mirror to ON.
Delete Mirroring
Delete Mirroring ensures total synchronicity between your source and destination feeds. When an original message is deleted from the source channel or group, ForwardBuddy immediately intercepts the deletion event and removes the forwarded copy from all destination channels.
✅ Available on: Basic and Pro plans | ❌ Free Plan: Bypassed.
Why Delete Mirroring Matters
Content moderation and time-sensitive publications require instant retraction across your entire channel network:
- Retracting Erroneous Signals: Quickly pull back a trading call, sports prediction, or financial update before audience actions are taken.
- Flash Deals & Expired Promos: Delete promotional discounts, coupon codes, or limited-time events once they are no longer valid.
- Moderation Cleanup: If a moderation team removes spam or policy-violating posts in the source channel, the clean-up automatically synchronizes across all mirror channels.
How It Works
- When ForwardBuddy forwards a post, it stores the mapping:
Source Message ID ➔ [Destination Chat IDs & Message IDs]. - The moment a delete update is detected in the source, ForwardBuddy queries this mapping.
- The bot or worker agent dispatches instant deletion API calls to all target destination chats.
How to Enable Delete Mirroring
- Open 📋 My Rules and select the target rule.
- Tap ⚙ Message Settings.
- Toggle Delete on Destination to ON.
Topic & Forum Routing
Telegram Forum Supergroups allow communities to organize discussions into dedicated topic threads. ForwardBuddy provides native support for Topic Routing, allowing you to direct forwarded posts into specific forum topics (threads) rather than dumping all messages into General chat.
✅ Available on: Free, Basic, and Pro plans.
Why Use Topic Routing?
Topic routing allows you to build sophisticated community aggregators inside a single Telegram supergroup:
- Categorized Feeds: Route crypto market updates to a
#crypto-newstopic, stock earnings to#stocks, and general announcements to#announcements. - Multi-Source Aggregation: Aggregate 10 different source channels and route each source into its own dedicated sub-topic inside one master community forum.
- Clean Discussion Spaces: Keep your main chat noise-free while still delivering real-time syndicated content to specialized topic subscribers.
How to Configure Topic Routing
- When creating a new rule via
/add(or editing destinations via/rulesor the Web Console), select your destination supergroup. - If the group has Telegram Topics enabled, ForwardBuddy will detect the forum status and prompt: "Select Target Forum Topic".
- Choose the desired topic from the interactive list, or send the numeric
message_thread_idmanually. - Save the rule. All subsequent forwarded messages will be dispatched straight into that topic thread.
Message Length Limit
The Message Length Limit feature allows you to automatically truncate forwarded messages at a specific character threshold. Any content exceeding your set limit is cut off before the message is sent to the destination feed.
✅ Available on: All plans (Free, Basic, Pro)
Common Use Cases for Length Limits
- Teaser Feeds: Forward only the first 200 characters of long-form articles to your public channel, encouraging readers to join your premium channel to read the full updates.
- Clean Feed Layout: Keep your channel looking tidy by preventing massive wall-of-text announcements from taking up the entire screen.
- Platform Limitations: Adapt posts to channels that prefer short-form summaries.
How It Works
The limit is counted in raw characters (including spaces and formatting characters). When a message exceeds the limit, it is sliced at exactly that character index. The truncated block is sent as-is — no ellipsis or "read more" is appended automatically, giving you the flexibility to configure your own transition using a Footer.
Evaluation order: The length cap is applied after Keyword Replacement completes, but before Headers and Footers are appended. This ensures your customized promotional footer or category header is never cut off.
How to Set a Message Length Limit
- Open 📋 My Rules and select your rule.
- Tap ➕ Additional → tap Limit.
- Enter the maximum number of characters you want to allow. Send it to the bot.
- To disable the limit and forward full-length messages, set the value to
0.
300, and append a custom footer like:
\n\n📖 Read full post in our main channel → @mychannel
This creates a beautiful, automated teaser flow that drives traffic directly to your source!
AI Transformations & BYOK
ForwardBuddy features an ultra-fast, real-time AI processing engine designed for automated content curation. With AI Transformations, every forwarded message or media caption can be rewritten, translated, summarized, tone-adapted, and semantically filtered in real time before it reaches destination feeds.
✅ Available on: Pro plan (Bring Your Own Key) | ❌ Free or Basic Plans: Locked.
Bring Your Own Key (BYOK)
ForwardBuddy operates on a transparent Bring Your Own Key (BYOK) model: you connect your own provider API key. This gives you complete autonomy over model choice, usage limits, and zero platform token markups. All API keys are securely encrypted at rest using industry-standard Fernet encryption.
Supported AI Providers & Models
| Provider | Supported Models | Best Used For |
|---|---|---|
| OpenAI | gpt-4o, gpt-4o-mini, gpt-3.5-turbo |
High-accuracy reasoning, nuanced rewrites, and multi-language translation. |
| Anthropic Claude | claude-3-5-sonnet, claude-3-haiku |
Long-form document summarization, analytical writing, and natural human tone. |
| Google Gemini | gemini-1.5-flash, gemini-1.5-pro |
Ultra-fast processing speeds, large context windows, and cost-effective scaling. |
| Groq | llama-3.3-70b-versatile, mixtral-8x7b-32768 |
Near-instantaneous, sub-second inference speeds for high-velocity signal channels. |
| DeepSeek | deepseek-chat, deepseek-reasoner |
Cost-effective structured logic, translation, and analytical transformation. |
| OpenRouter | Any model supported on OpenRouter | Flexible access to thousands of open-source and specialized frontier models. |
AI Transformation Capabilities
- 🔄 Rewrite & Paraphrase: Automatically restructures sentences and vocabulary to produce unique, original posts while maintaining 100% factual accuracy.
- 🌍 Real-Time Translation: Seamlessly translates incoming posts into any target language (e.g., English, Hindi, Russian, Arabic, Spanish, Ukrainian, etc.).
- ✂️ Shorten & Summarize: Condenses long research essays, news articles, or multi-paragraph announcements into concise, scannable bullet points.
- 🎭 Tone & Style Adaptation: Re-formats messages to match your community vibe — Professional Corporate, Casual Community, Urgent Breaking News, or Social Media Viral.
- 🛠️ Custom System Instructions: Define arbitrary prompt templates, strict output schemas, custom tags, or mandatory disclaimer injections.
Smart Semantic Filtering
Beyond traditional keyword whitelists and blacklists, ForwardBuddy supports AI Semantic Filtering. The AI understands the context and meaning of a message to decide whether to forward or drop it:
# Only forward real news, skip promotional ads:
"Forward breaking tech and AI announcements. Drop any sponsored promotional posts, affiliate deals, or crypto token airdrops."

# Sports predictions filter:
"Only forward match predictions and final scores. Drop player gossip and banter."
Live "Test It" Preview Simulator
Before deploying an AI prompt to live audiences, you can test your prompt against real sample text directly inside the bot or the Web Console AI Studio. You can view the transformed text, verify translation accuracy, and inspect token latency in real time.
Smart 6-Hour Token Caching
ForwardBuddy uses an intelligent caching layer: prompt instructions and post hashes are cached for 6 hours. If a rule forwards a single post to 10 different destination channels, ForwardBuddy only performs one single AI call and fans out the result — saving up to 90% in provider token costs.
How to Set Up AI Transformations
- Open 🤖 AI Studio in the Web Console (or via bot menu).
- Save your provider API key (e.g., OpenAI or Groq).
- Configure your prompt profile (Rewrite, Translate, Summarize, or Custom).
- In your forwarding rule settings, toggle AI Transformation to ON and select your prompt profile.
Connect Your Own Account
Connect Your Own Account lets you log your personal Telegram account into ForwardBuddy and use it as the forwarding engine. Instead of adding a bot or one of ForwardBuddy's shared helper accounts to your channels, your own account does the reading and posting — so you can forward from and to any channel or group you are already a member of, with zero setup in the channels themselves.
✅ Available on: Pro plan only | ❌ Free or Basic Plans: Locked.
Why Connect Your Own Account?
- No admin access needed: Forward from channels where you can't add a bot as admin — as long as your account is a member, it works.
- Private channels: Your existing memberships carry over. No helper account has to join anything.
- Pick from your chat list: When creating a rule, you browse and search your own dialogs to pick the source and destination — no links to paste.
- Powers Channel Cloning: A connected account is also the engine behind the Clone Channel tool.
How to Connect
-
1Open My Account
From the bot's main menu, open 👤 My Account and tap 👤 Connect My Account.
-
2Send Your Phone Number
Send your phone number in international format, e.g.
+919876543210. Telegram will send a login code to your account. -
3Enter the Login Code
Type the code you received into the bot. If your account has Two-Step Verification (2FA) enabled, the bot will also ask for your cloud password.
-
4Done — Use It in Rules
Once connected, a new 👤 Use My Account option appears when you create a forwarding rule. Choose it to pick your source and destination straight from your own chat list — with search and pagination for large accounts.
Privacy & Disconnecting
- Your login session stays on ForwardBuddy's server and is used only to run the forwarding rules you create.
- You can tap 🔌 Disconnect My Account at any time — this fully logs the session out and removes it from the server.
Clone Channel
Clone Channel is a comprehensive historical backfill engine: it copies the existing message history of one channel or group into another. While standard forwarding rules handle new messages in real time, Clone Channel reaches back and systematically migrates past archives — essential for channel migrations, backup mirrors, and community bootstrapping.
✅ Available on: Pro plan only | ❌ Free or Basic Plans: Locked.
What You Can Clone
When starting a clone, you choose exactly which slice of history to copy:
| Range Option | What Gets Copied |
|---|---|
| Whole channel | Every message from the very beginning of the channel's history. |
| From a message link | Paste a t.me/... message link — cloning starts at that specific message and continues to the end. |
| Date range | Only messages posted between two dates you specify. |
Clone Options & Transformations
Before starting, you can customize how cloned messages look using ForwardBuddy's content tools:
- 🔝 Header / 🔚 Footer: Add custom branding, credits, or referral disclaimers above or below every cloned message.
- 🔄 Keyword Replacements: Send pairs as
old | new(one per line) to rewrite handles, links, or branding across the entire copied history. - 🔽 Content Filters: Filter which message types (text, photos, videos, documents, audio, etc.) are included in the clone.
- 🚫 Blocked Words & Blacklist: Automatically skips historical posts that contain blacklisted keywords or blocked phrases.
Advanced Clone Safeguards & Features
| Feature | How It Works |
|---|---|
| ⏱️ Pacing & Rate-Limit Controls | Configure custom delays between messages (from 2 seconds up to 10 minutes) to prevent Telegram FloodWait restrictions and protect user accounts from temporary bans. |
| 📅 Chronological Ordering | Guarantees that historical posts arrive in the exact order they were originally published in the source channel. |
| 🔒 Protected Media Cloning | If the source channel has "Restrict saving content" enabled, ForwardBuddy downloads and re-uploads media files rather than failing or skipping them. |
| 🔄 Expired File Reference Refresh | Telegram file references expire on long clones. ForwardBuddy automatically re-fetches fresh file references during backfill execution without failing midway. |
| ⏯️ Resumable Progress | Track live progress metrics (copied / total), pause, resume, or cancel at any moment. Survives server restarts seamlessly. |
How to Run a Clone
- Connect your own Telegram account first (see Connect Your Own Account) — the clone runs through your account, so it can read any channel you're a member of.
- Open 🧬 Clone Channel from the bot's main menu or the Clone Studio in the Web Console.
- Pick the source (copy from) and the destination (copy to) from your chat list.
- Choose the range (whole channel, from a message link, or a date range).
- Set your pacing delay and adjustments (header, footer, replacements, filters, blocked words), then tap Start Clone.
Keep Syncing After the Clone
When the clone completes, the bot prompts: "Keep syncing new messages?" Accept, and it creates a regular live forwarding rule from the same source to the same destination — so every new post keeps flowing automatically after the historical backfill. Decline, and the clone remains a one-time copy.
Photo Watermarks
Headers and footers brand your text — but text is trivially stripped, and a screenshot carries none of it. A watermark is burned into the image itself: your logo or channel handle is rendered onto every photo the rule forwards, so your content stays attributable even after someone re-shares, re-uploads, or screenshots it.
✅ Available on: Pro plan only | ❌ Free or Basic Plans: Locked.
How Watermarks Are Organised
A watermark belongs to you, not to a single rule. You build a small library — up to 5 watermarks on Pro — and switch one on per rule. Adjust a watermark's opacity or position once, and every rule using it updates immediately; there's no need to re-upload your logo for each rule.
Two Kinds of Watermark
| Type | What You Send | Best For |
|---|---|---|
| 🖼 Logo Image | An image file, up to 5 MB. A PNG with a transparent background gives by far the cleanest result. Send it as a photo or as a file. | Brand marks, channel logos, badges. |
| 🔤 Text | A short string, up to 128 characters — e.g. @yourchannel. |
Handles, credits, "Join @channel" stamps. |
Text watermarks are sized by measuring the string against the target image, so a stamp reads the same on a small 500px photo as it does on a 4000px one.
Creating a Watermark
- Open 📋 My Rules and select a rule (or configure it while creating a new rule).
- Tap ➕ Additional → 🖼 Watermark.
- Tap ➕ Create Watermark and choose 🖼 Logo Image or 🔤 Text.
- Send a short name so you can recognise it in the library later (e.g. Main logo).
- Send the logo image, or the text to stamp.
- The bot shows a live preview — adjust it (below), then tap ✅ Use On This Rule.
Adjusting How It Looks
Alignment, opacity, and size are tap-to-change pickers, and the preview image re-renders on every tap — numbers alone tell you nothing about how a mark will actually land on a photo. All three stay editable after creation.
| Setting | Options | Default |
|---|---|---|
| ✏️ Alignment | A 3×3 grid — any corner, edge, or the centre — plus 🔳 Tile, which repeats the mark across the whole image so it can't be cropped out. | ↘ Bottom right |
| 🌫 Opacity | 10%, 25%, 40%, 55%, 70%, 85%, or 100%. Lower values sit quietly behind the content; higher values are harder to remove. | 70% |
| 📏 Size | 5%, 10%, 15%, 20%, 30%, or 40% of the image width. | 20% |
Switching a Watermark On or Off
- To apply one: Open ➕ Additional → 🖼 Watermark, tap a watermark in the library, then ✅ Use On This Rule. The active one is ticked in the list, and the Watermark button shows its name.
- To turn it off: Tap 🚫 No Watermark. The watermark stays in your library for other rules.
- To delete one for good: Open it and tap 🗑 Delete. Rules using it simply forward photos unstamped afterwards.
What Gets Watermarked
| Content | Watermarked? | Details |
|---|---|---|
| Photos | ✅ Yes | Standard Telegram photos, at full resolution. |
| Albums (media groups) | ✅ Yes | Every photo in the album is stamped. |
| Images sent as files | ✅ Yes | JPG, PNG, and WebP documents are recognised as images and stamped. |
| Videos, GIFs, stickers | ❌ No | Out of scope — they pass through untouched, exactly as before. |
| Text messages, other files | ❌ No | Nothing to stamp; use Header & Footer for these. |
Web Console & Mini App
In addition to the conversational bot, ForwardBuddy provides a modern single-screen web console built with Next.js and Tailwind CSS. You can open it inside any desktop or mobile browser, or run it directly inside Telegram as a Telegram Mini App.
✅ Available on: All plans (Free, Basic, and Pro).
Zero-Password Secure Handshake
You never need to create or remember passwords. Simply tap the Web Console button inside @ForwardBuddyBot (or use /docs / mini app launcher). ForwardBuddy performs an instant, cryptographically signed handshake that authenticates your Telegram ID securely.
Core Web Console Features
Multi-Language & Global Currencies
The Web Console natively supports 8 languages with complete Right-to-Left (RTL) styling for Arabic, and lets you view prices in 10 global currencies:
- Supported Languages: English, Hindi, Russian, Arabic (RTL), Ukrainian, Indonesian, Spanish, Korean.
- Supported Currencies: USD, EUR, INR, RUB, IDR, UAH, KRW, SAR, GBP, JPY.
Plans & Pricing
ForwardBuddy offers three subscription tiers designed to grow with your forwarding operations — from a free starter tier to a Pro tier for high-volume network syndication.
Plan Comparison Matrix
- Up to 5 Rules
- 3 Source Chats per Rule
- 1 Custom Bot
- 200 msgs / day
- With-Bot Forwarding Engine
- Content-type filters
- Web Console & Mini App
- Up to 10 Rules
- 10 Source Chats per Rule
- 5 Custom Bots
- Unlimited messages
- Shared Agent Pool (Without-Bot)
- Edit & Delete Mirroring
- Topic & Forum Routing
- Whitelist / Blacklist (incl. regex)
- Keyword Replacement
- Delay Forwarding & Hours
- Skip Duplicates
- Up to 30 Rules
- 50 Source Chats per Rule
- 10 Custom Bots
- Unlimited messages
- AI Suite & BYOK (Rewrite, Translate, Filter)
- Connect Your Own Account (My Account)
- Clone Channel (Historical Backfill)
- Photo Watermarks (Up to 5 Presets)
- Edit & Delete Mirroring
- Topic & Forum Routing
- Header & Footer Branding
- Reply Preservation
- Priority Support
Free Pro Month Reward Claim
You can unlock a Free 30-Day Pro Subscription without spending anything! ForwardBuddy rewards active community members:
- Step 1: Open 🎁 Free Pro in the bot or Web Console.
- Step 2: Join our official partner and announcement channels.
- Step 3: Share your personal referral link with friends.
- Step 4: Tap Claim Pro Reward — your account will be upgraded immediately to Pro for 30 days!
How to Upgrade
- Open the bot and tap ⬆ Upgrade from the main menu (or use
/premium). - Select your desired plan (Basic or Pro).
- Review the plan details and pricing in your selected currency.
- Choose your preferred payment method on the Weego Pay checkout screen.
Your subscription features are unlocked immediately after a successful transaction completes.
Payment Methods Supported (Powered by Weego Pay)
| Method | Accepted Currencies | Processing Provider | Description |
|---|---|---|---|
| UPI (India) | INR | Instant Banking UPI | Instant QR scan and direct UPI Intent for Indian banking apps (GPay, PhonePe, Paytm). |
| Credit / Debit Cards | USD, EUR, GBP, & Global | Global Card Gateway | Secure international card payments with 3D Secure fraud protection. |
| Crypto (USDT / Multi-Chain) | USDT, BTC, ETH, TON, SOL | Cryptomus Checkout | Fast decentralized cryptocurrency payments across major blockchains. |
| Binance Pay | USDT / BUSD | Binance Pay Direct | Instant zero-gas-fee payments directly from your Binance wallet with automated order verification. |
💡 Tip: Type /premium in the bot at any time to jump straight to your subscription status and the upgrade menu.
Plan Expiry & Renewal Details
- Monthly Cycle: Subscriptions run for a 30-day period. You can monitor active subscription days directly in the bot menu or Web Console.
- Graceful Downgrade: When a plan expires, your account drops to the Free tier. Your existing rules and configurations remain saved, but any Pro or Basic-only features will be bypassed.
- Upgrading from Basic to Pro: If you upgrade to Pro while having active Basic subscription days, those remaining days are forfeited. The bot will show a confirmation warning detailing this before you pay.
Managing Your Rules
Once you've configured your forwarding flows, ForwardBuddy provides a robust suite of options to view, edit, pause, or remove your active rules instantly.
Viewing and Editing Rules
From the main bot menu, tap 📋 My Rules. You'll see a complete list of your rules detailing:
- The rule's name, or the name of its primary source channel.
- A
+Nsuffix on aggregated rules, showing how many extra source chats feed it. - The number of linked destinations.
- The current operational status (Active 🟢 or Paused 🟡).
Tap on any rule in the list to open its settings and change configurations:
| Configuration Target | Menu Selection Pathway |
|---|---|
| Source Chats | Tap 📡 Edit Source Chats → ➕ Add Another Source or ❌ to remove |
| Destinations | Tap Destinations → tap Add or Remove |
| Content Filters | Tap 🔽 Filters |
| Forward Tag & Edit Mirror | Tap ⚙ Message Settings |
| Keywords, Delays, Forwarding Hours & Watermarks | Tap ➕ Additional |
| Rule Name | Tap ✏️ Rename |
Naming Your Rules
Rules can carry a custom name (up to 64 characters) so a long rule list stays readable — e.g. Crypto News → My Channel instead of an anonymous source title.
- While creating a rule: Tap 📛 Rule Name in the rule setup screen and send your name before saving.
- On an existing rule: Open the rule under 📋 My Rules and tap ✏️ Rename.
Rule Statistics
Every rule tracks how much work it has done. Open a rule under 📋 My Rules and tap 📊 Stats to see:
- Messages forwarded — the total number of successful deliveries made by this rule.
- Last forwarded — when the rule most recently delivered a message, so you can spot a source that has gone quiet at a glance.
Duplicating a Rule
Built a rule with a carefully tuned set of filters, replacements, headers, and delays — and want the same setup for another source channel? Tap 📑 Duplicate inside the rule's detail menu. ForwardBuddy copies every setting into a new draft rule; you just pick the new source channel and save. The duplicate counts toward your plan's rule limit like any other rule.
Several Rules from the Same Source
One source channel can back as many rules as your plan allows. This is useful when the same channel needs to be treated differently in different places — for example, one rule forwarding everything to your private archive, and a second forwarding only photos, with a footer, to your public channel. Each rule keeps its own filters, destinations, and settings, and they run independently: a problem in one never stops the others.
Automatic Destination Cleanup
If a destination becomes permanently unreachable — the bot is kicked or blocked, or the chat is deleted — ForwardBuddy automatically removes that destination from the rule instead of failing silently forever. You receive an alert naming the removed destination and the affected rule, so you can re-add it once access is restored. Other destinations on the same rule keep working uninterrupted.
Pausing and Resuming a Rule
If you need to temporarily stop message forwarding without losing your complex rules and replacement settings, you can pause the rule. Paused rules retain all details but ignore source updates.
- To Pause: Select the rule under 📋 My Rules, and tap Pause.
- To Resume: Tap Resume on the same rule detail view. Forwarding resumes immediately for all new posts. Messages that arrived while the rule was paused are not retroactively forwarded.
Deleting a Rule
To permanently clear a rule, tap 🗑 Delete Rule inside the rule detail menu and confirm. This action is irreversible. All settings, mappings, and databases linked to the rule are completely erased.
Using Custom Bot Tokens
By default, your rules operate through ForwardBuddy's shared bot pool. If you want a more white-labeled, professional setup with your own custom bot name, profile picture, and Telegram handle, you can bind a custom bot token.
Setup Instructions:
- Create a new bot via Telegram's official bot: @BotFather.
- Copy the HTTP API token BotFather generates.
- In ForwardBuddy, select 🤖 My Bots from the main menu.
- Tap ➕ Add Bot and paste your token.
- When creating or editing rules in "With Bot" mode, select your custom bot. Add your custom bot as the administrator of your source and destination feeds.
| Plan | Max Rules Allowed | Max Sources per Rule | Max Custom Bots Allowed |
|---|---|---|---|
| Free | 5 rules | 3 sources | 1 custom bot |
| Basic | 10 rules | 10 sources | 5 custom bots |
| Pro | 30 rules | 50 sources | 10 custom bots |