
Introduction
Welcome to the official documentation for SupportBuddy — Weego's high-performance multi-bot Telegram customer service ticketing solution. Built to manage active support desks directly inside your native Telegram channels and groups, SupportBuddy bridges the gap between your customers and support agents flawlessly.
With SupportBuddy, you don't need a clunky external helpdesk tool. When a customer messages your dedicated Telegram support bot, SupportBuddy automatically creates a separate, cleanly isolated Forum Topic Thread inside your Central Support Group. Your agents can chat directly inside that topic, and the bot seamlessly forwards answers back to the user's private chat window in real time.
How It Works (The Messaging Flow)
SupportBuddy acts as a real-time messaging pipeline. Let's trace the architectural thread:
Core Features Dashboard
/close and the customer is automatically asked to rate it from 1 to 5 stars.Getting Started
Set up your own dedicated helpdesk bot in less than 5 minutes. Follow this step-by-step onboarding guide:
-
1Start Weego Support Master Bot
Open Telegram, search for @WeegoSupportBot, or click the direct launch link: t.me/WeegoSupportBot. Press Start. You'll be greeted with the main setup menu.
Official Channel Join Required: To unlock support bot creation, you will be prompted to join Weego's official update channel first. Join the channel and click "I've Joined" to unlock controls.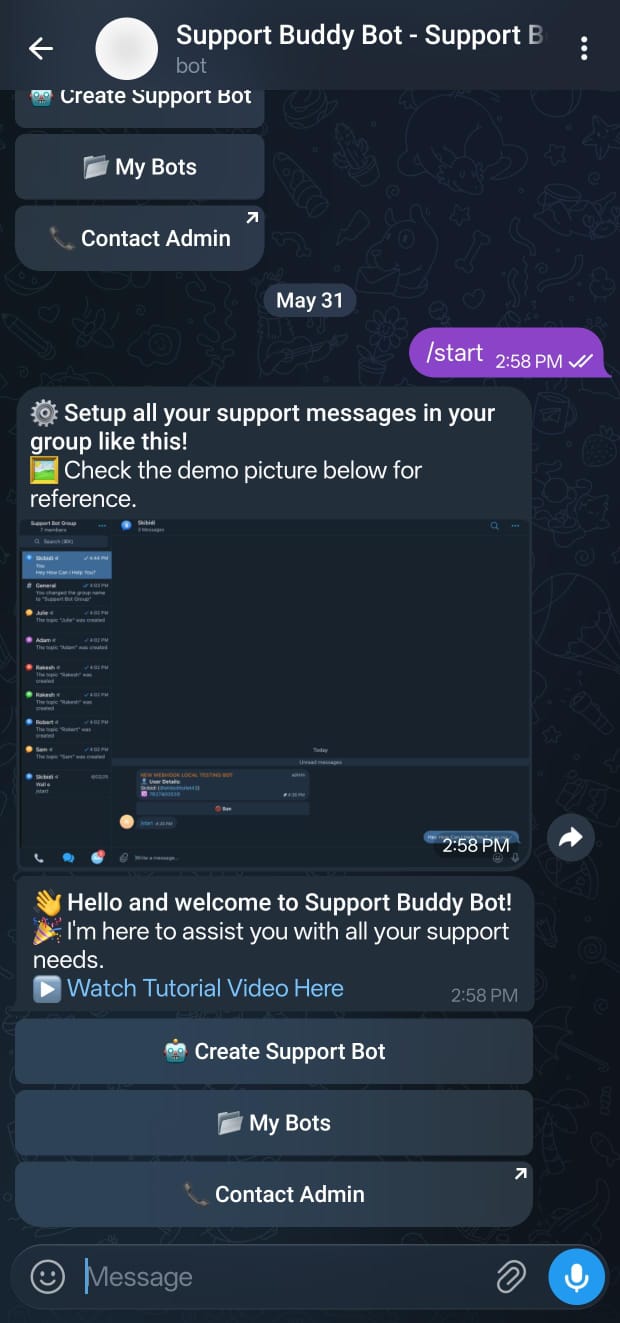
-
2Register Your Custom Bot Token
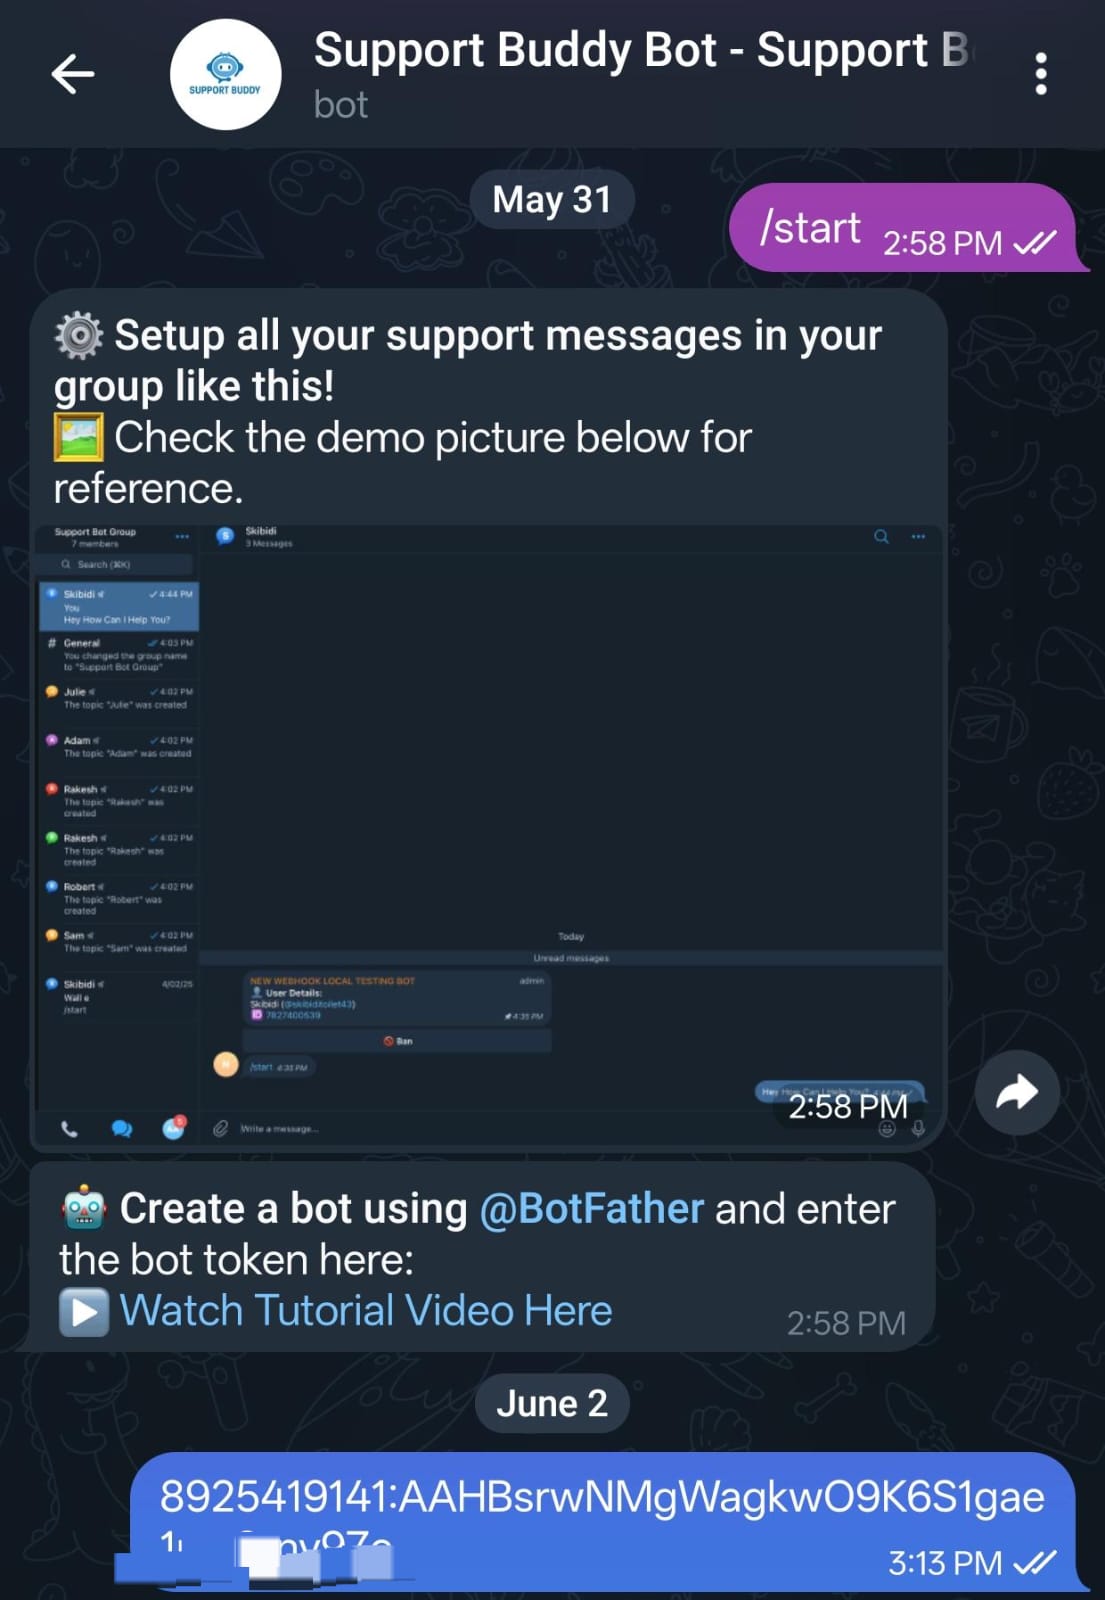
Tap 🤖 Create Support Bot in the
@WeegoSupportBotmain menu (or send/createbot). The bot will prompt you to enter an HTTP API token. To generate one:- Open Telegram's official bot architect: @BotFather.
- Send the command
/newbotand follow the instructions to choose a name and custom username. - Copy the generated HTTP API token (e.g.
7563482769:AAG4XT...) and send it directly to Weego Support Bot.
-
3Create a Telegram Support Group
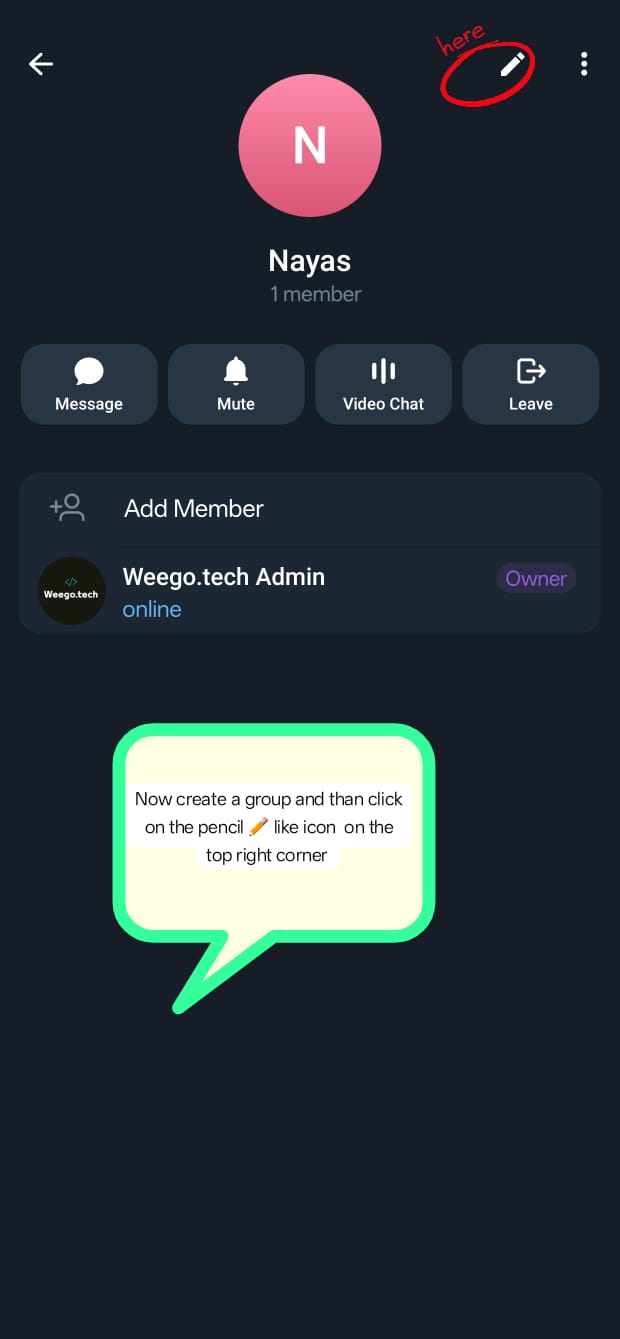
Create a standard Telegram group for your support agents and moderators. Once the group is created:
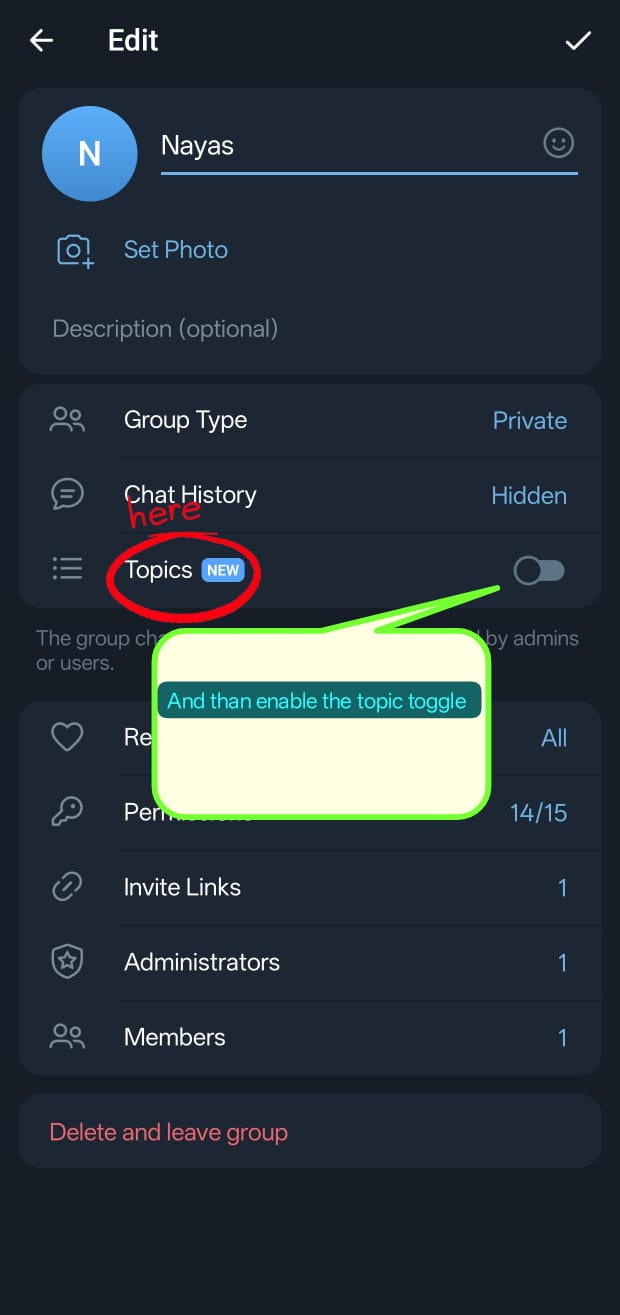
- Open Group Info ➔ Edit settings.
- Enable Topics toggle (Forum mode). This is a critical requirement for ticket sorting.
- Add your freshly created custom bot as an Administrator in the group. Make sure to grant permissions to "Manage Topics", "Pin Messages", and "Post Messages".
-
4Bind Support Group and Verify Webhooks
Now open your own newly created bot in Telegram (not the master bot) and send
/start. Because no support group is linked yet, it replies with "⚙️ Setup Required" and shows a 💬 Add Support Group button.Tap it and pick the forum group you created in step 3. Telegram will only let you pick groups where you are an admin and Topics are enabled — if your group doesn't appear in the picker, go back and check both. Once selected, the bot confirms with your Bot ID, username, and Support Group ID.
You're live. From this point on, every setting — welcome message, FAQs, broadcasts, statistics — lives in your own bot's/startmenu. The master bot@WeegoSupportBotis only used to create, list, and delete bots. -
5Explore Your Owner Control Panel
Sending
/startto your own bot as its owner opens the control panel:- 🔄 Change Support Group — move tickets to a different forum group.
- 💬 Set Welcome Message — see Custom Greetings.
- 📋 Manage FAQs — see FAQ Auto-Responder.
- 📢 Broadcast — see Announcements Broadcast.
- 📊 Statistics — see Analytics Dashboard.
- 💎 Buy Premium — shown only while you're on the free plan.
Support Group Setup
To establish a flawless ticket dispatching system, SupportBuddy relies on active Forum Topics inside your designated support group. If topics are not enabled or permissions are incomplete, the bot will notify you with configuration warnings.
"⚠️ Setup Incomplete! Please enable Topics in group settings."
Enabling Topics & Perms Checklist
Ensure your support group settings perfectly meet the following checklist:
- Topics Toggle: Active. Allows creation of separate conversation threads.
- Bot Permissions:
- Post Messages: Yes. Enabled for sending agent copies.
- Manage Topics: Yes. Required to programmatically create and edit threads for new clients.
- Pin Messages: Yes. Required to pin user details cards at the top of each thread.
Changing Your Support Chat Group
If you need to change your central support group in the future, send /start to your own support bot and tap 🔄 Change Support Group, then pick the new forum group. However, keep the following alert in mind:
Custom Greetings
First impressions matter. SupportBuddy allows bot owners to fully customize the greeting welcome message that is sent to customers when they start the bot.
How to Set Custom Greetings
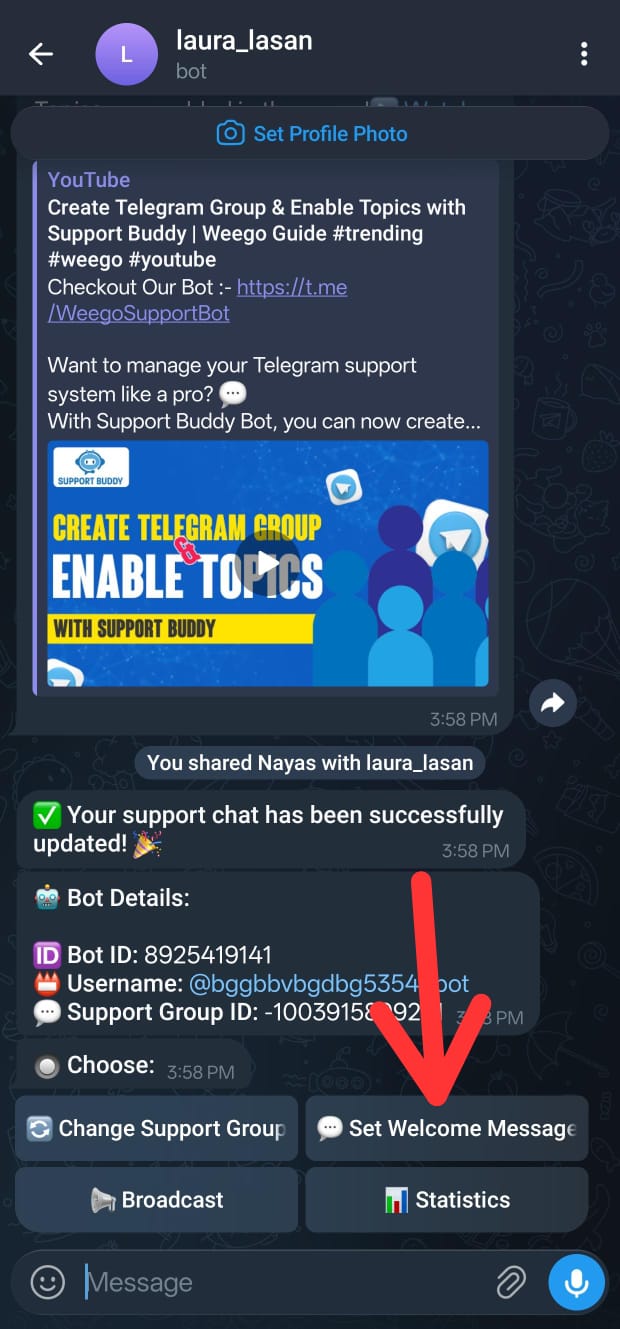
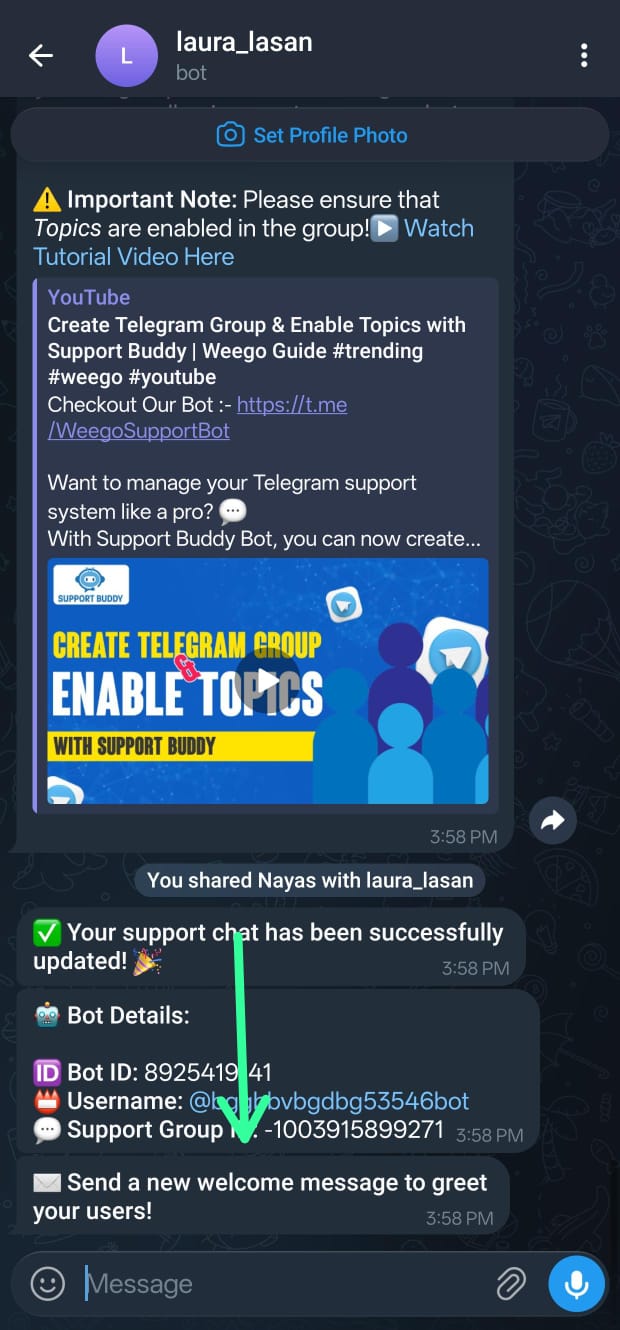
- Open your own support bot in Telegram and send
/start. - Tap 💬 Set Welcome Message. If one is already set, the bot shows you a copy of it with a 💬 Change Welcome Msg button.
- Send the styled greeting message to the bot. You can use standard formatting like bold, italics, code, hyperlinks, and even attach media (like images or intro guides).
- The bot will present a preview and ask you to confirm:
"❓ Are you sure you want to set this as your welcome message?". Tap Yes to save.
Default Welcome Greeting
If you don't configure a custom greeting, the bot will automatically fall back to Weego's built-in default welcoming template:
🚀 Welcome to [Bot Username]! 🚀

Hi there! 👋 I'm here to assist you with any support-related queries.

Whether you need help with our services, have a question, or need technical support, I've got you covered!Ticket Assignment Modes
Every bot's Settings menu has a Ticket assignment toggle that decides how your team divides up incoming conversations. Switch it from @WeegoSupportBot → Settings → tap the assignment row to flip between the two modes.
Open Mode (Default)
Anyone in your support group can reply to anyone. Simple, and best for small teams where everyone sees everything.
Claim Mode
The first agent to reply to a ticket automatically takes ownership of that conversation. If another agent tries to reply to a ticket that isn't theirs, their reply still goes through — the customer is never blocked — but they get a warning: "⚠️ Heads up: this ticket belongs to [Agent]. Your reply was still sent — use /claim if you're taking it over."
Three commands, typed inside the ticket's forum topic, manage ownership in Claim mode:
/claim— take ownership of the current ticket, including taking it over from another agent./release— hand the ticket back to the pool so anyone can pick it up./assign(as a reply to a teammate's message) — hand the ticket directly to them.
Response Time Alerts
Response alerts chase tickets that have gone unanswered past your promised reply time, so a customer doesn't sit waiting while nobody notices. Configure it from Settings → ⏰ Response alerts, choosing Off, 5, 15, 30, 60, or 120 minutes.
How the Nudge Works
When a ticket's first reply hasn't landed by the deadline, the bot posts directly into that ticket's topic:
⏰ Waiting 45 minutes with no reply.
Nobody has picked this up yet.
In Claim mode, if the ticket is already assigned, the alert names the agent instead: "Assigned to [Agent]."
Escalation
If the ticket still has no reply after roughly double the alert window, the bot escalates by messaging you (the bot owner) directly: "🚨 A ticket still has no reply after 2h. Bot: @YourSupportBot."
Working Hours & Away Message
Tell SupportBuddy when your team is actually online so customers get honest expectations, and your Response Alerts stay quiet when nobody can act on them anyway. Configure it from Settings → 🕘 Working hours.
Setting It Up
- Enable/Disable: toggles the whole feature on or off. The first time you turn it on, a sane default weekday schedule is seeded automatically.
- Set hours: send a range like
09:00-18:00. Overnight desks like22:00-06:00are supported too. - Days: cycles through day-of-week presets (e.g. weekdays only, every day).
- Set timezone: send a Region/City name, e.g.
Asia/KolkataorAmerica/New_York. This timezone also drives the Owner Digest send time. - Away message: customize what customers see when they message outside these hours. Include the placeholder
{back}and it's replaced with when you're next open. Senddefaultto reset to the standard wording.
What Customers See
A customer messaging outside working hours still reaches your team as normal — nothing is blocked — but they also get an automatic heads-up, sent at most once per away period so it doesn't repeat on every message:
We're currently outside our working hours.
Your message is saved and we'll reply as soon as we're back.Attachment Controls
Decide exactly what kinds of message your customers are allowed to send. Configure it from Settings → 📎 Attachments, where every content type is listed with a tap-to-toggle status.
- 🖼 Photos
- 🎬 Videos
- 📎 Files (documents)
- 🎤 Voice notes
- ⭕ Video notes
- 🎵 Audio
- 🎞 GIFs
- 🌟 Stickers
When a customer sends a blocked type, it never reaches your team. They're told politely and asked to write instead: "🚫 We can't accept [type] here. Please send your question as a message and our team will help."
Voice Transcription
Agents can't always play audio at their desk. When it's on, SupportBuddy automatically writes out a text transcript underneath every voice note, video note, and audio file a customer sends — right inside the forum topic — so your team can read instead of listen, and search it later.
"💎 Voice transcription is a Premium feature."
Turning It On
- In
@WeegoSupportBot, open your bot's Settings menu and tap 🎤 Voice transcription. - Tap ⚪ Off (tap to turn on) to enable it — it becomes 🟢 On (tap to turn off).
- Tap 🌐 Spoken language to tell the model what language to expect, or leave it on Auto-detect. Naming the language helps with short clips or when customers mix two languages in a sentence — but getting it wrong makes results worse, not better.
- Tap 🔁 Translate to English to have every transcript come back in English, regardless of the spoken language.
- Tap 🔤 Roman script (Hinglish) to get transcripts in Roman letters instead of native script — e.g.
"aur bhai kya haal hai"instead of Devanagari. This is a nudge to the model, so the odd line may still come back in its original script.
What Agents See
The moment a voice note lands, the bot immediately posts a "📝 Transcribing…" placeholder in the topic — silence otherwise looks like nothing is happening. That placeholder is then edited in place with the result, so the topic gains one message instead of two:
📝 Transcript
"Hi, I wanted to ask about my refund status..."

— or, if nothing was said —
📝 No speech found in this one.

— or, if it failed —
⚠️ Couldn't transcribe this one — the audio is still above.
Limits
- Length cap: voice notes longer than 5 minutes are not transcribed. The bot posts
"📝 Voice note is longer than 5 minutes — not transcribed."and skips straight past — no placeholder, no wasted call. - Supported languages: Auto-detect, English, Hindi, Bengali, Tamil, Telugu, Marathi, Urdu, Arabic, Spanish, Russian, and Portuguese.
- Server availability: if transcription isn't configured on the server yet, the toggle warns instead of silently doing nothing:
"⚠️ Voice transcription isn't configured on this server yet."
FAQ Auto-Responder
Most support desks answer the same handful of questions all day long. SupportBuddy's FAQ engine watches incoming customer messages, and when one looks like a question you've already answered, it replies instantly — before your team ever has to read it.
Adding Your First FAQ
-
1Open the FAQ Menu
Send
/startto your own support bot and tap 📋 Manage FAQs. You'll see the list of existing FAQs, each with a 🟢 (active) or ⚪ (disabled) marker. -
2Add Trigger Keywords
Tap ➕ Add FAQ. The bot asks for the keyword(s) that should trigger this answer. Separate multiple variants with commas so one FAQ can catch several phrasings:
Example Trigger Phraserefund, money back, return policy, how do i get a refund -
3Write the Answer
Send the text the bot should reply with. The bot then shows a summary —
"❓ Save this FAQ?"with your triggers and answer — and you tap ✅ Yes to save. You'll get"✅ FAQ saved! The bot will now auto-answer matching messages."
How Matching Works
SupportBuddy does not require an exact match. Each incoming text message is compared against every variant of every active FAQ using fuzzy matching, so real-world typing still connects:
- Fuzzy, not literal: "wheres my refund??" still matches the trigger
refund. - Case-insensitive and whitespace-tolerant.
- Best match wins: if several FAQs are close, only the strongest match replies — a customer never gets two auto-answers at once.
- Confidence threshold: weak matches are ignored on purpose, so an unrelated message is passed straight to your agents instead of getting a wrong canned answer.
- Text only: photos, files, voice notes, and stickers are never auto-answered.
help or hi will swallow messages that should have reached a human.
What Your Agents See
When an FAQ fires, the customer's original message is still copied into their forum topic, immediately followed by a marker:
🤖 Bot auto-answered this with an FAQ response.
Reply here if the user still needs help.
Agents can simply keep typing in the topic to take over the conversation as usual.
Editing, Disabling & Deleting
Tap any FAQ in the list to open it. The detail screen shows its triggers, its answer, how many times it has auto-answered, and its status:
🔑 Triggers: refund, money back, return policy
💬 Answer: Refunds are processed within 5-7 business days.
📊 Auto-answered: 128 times
🔘 Status: 🟢 Active- ⏸️ Disable / ▶️ Enable — pause an FAQ without losing it or its hit count. Disabled FAQs are never matched.
- 🗑️ Delete — asks for confirmation first, then removes the FAQ permanently.
To reword an FAQ, delete it and add it again — there's no in-place edit.
Plan Limits
| Plan | FAQ Auto-Responses |
|---|---|
| Free | Up to 5 FAQs per bot |
| Premium | Unlimited FAQs per bot |
Trying to add a sixth FAQ on the free plan shows: "🚫 Free plan limit reached (5/5 FAQs). 💎 Upgrade to Premium for unlimited FAQ auto-responses." See Premium Plans.
Messaging & Topics Flow
SupportBuddy dispatches client messages instantly. This section walks you through how thread mapping and forwarding behave under the hood.
User Profile Pin (Forum Header)
When a new user starts your support bot, the bot automatically creates a new Forum Topic inside your Telegram group named after the customer's full name. Inside that topic, SupportBuddy pins a user details card for quick agent context:
👤 User Details:
Ritik Kumar (@ritik_weego)
🆔 ID: 597284903
Clean Real-time Mirroring
Every message your client sends to the bot (text, photo, file, sticker, voice note, etc.) is instantly copied and posted inside their designated forum topic. Your support agents simply chat inside that topic thread. Any text, media, or file your agents type or reply with inside that topic is copied and sent back directly to the client's private bot screen.
Live Edit & Reaction Sync
Edits and reactions are mirrored in real time on both sides of the conversation — not just relayed once and left to go stale:
- Edited messages: if a customer edits their message, the copy sitting in the topic thread updates to match — and the same happens in reverse when an agent edits their reply, the customer's copy updates too. If a message predates threading (or its counterpart can't be found), the bot falls back to a plain notice instead of leaving stale text in place.
- Reactions: an emoji reaction added by an agent in the topic is mirrored onto the customer's copy of that message, and a reaction the customer adds is mirrored back onto the agent's copy. Custom (Premium) emoji reactions can't be set by bots, so only standard emoji reactions are mirrored.
Canned Quick Replies
Save your team's most-used answers as shortcuts agents can fire off with a single command, instead of retyping the same reply every time. Manage them from @WeegoSupportBot → your bot's admin menu → Quick Replies.
Saving a Reply
- Tap ➕ to add one.
- Send a shortcut name — letters, numbers, underscores, and hyphens only (up to 40 characters), since it has to survive being typed as a command.
- Send the reply body. Include
{name}anywhere in the text and it's replaced with the customer's first name (or group title) when sent.
Saving a shortcut that already exists overwrites it, and the bot tells you so rather than silently creating a duplicate.
Using It in a Topic
Inside a customer's forum topic, type /r <shortcut> to instantly send that saved reply to the customer. Typing /r with no shortcut lists every saved shortcut for that bot.
/r refund

⚡️ Sent via /r refund — Agent Name
Your refund has been processed and should arrive within 3-5 business days.
A quick reply counts as a real agent reply — it starts the response-time clock, threads correctly if the customer replies to it, and (in Claim mode) claims the ticket just like a typed message would.
Tickets & Ratings
A forum topic lives forever, but a conversation doesn't. SupportBuddy tracks each customer conversation as a discrete ticket so you can measure how fast you answer, how much you close, and how happy people were at the end of it.
When a Ticket Opens
A ticket opens automatically the first time a customer writes to your bot — no command needed. It stays open while the conversation continues, and the clock on your first reply time starts the moment it opens and stops when an agent posts the first message in that topic.
Closing a Ticket
When the issue is resolved, an agent types /close inside that customer's forum topic. The bot confirms in the topic:
✅ Ticket closed by Ritik.
The user was asked to rate this conversation.
Their next message opens a new ticket.
If you run /close in a topic with nothing open, the bot answers "ℹ️ There's no open ticket in this topic." and does nothing.
/close ends the conversation, not the topic. The forum topic and its full history stay exactly where they are — the customer's next message simply starts a fresh ticket in the same thread.
Customer Satisfaction Ratings (CSAT)
The moment a ticket is closed, the customer receives a rating prompt in their private chat with the bot:
✅ Your support request has been closed.

How did we do? Your rating helps us improve.

  [ ⭐ ]
  [ ⭐⭐ ]
  [ ⭐⭐⭐ ]
  [ ⭐⭐⭐⭐ ]
  [ ⭐⭐⭐⭐⭐ ]
Tapping a star replies "🙏 Thanks for the feedback!" and posts the score straight into the agent's topic:
⭐ User rated this conversation: ⭐⭐⭐⭐ (4/5)- One rating per ticket. A second attempt shows "You've already rated this conversation."
- Ratings are tied to their ticket, so a customer who rates days later still scores the right conversation.
- Only the customer who owns the ticket can rate it.
- Rating is optional. If the customer blocked the bot or simply ignores the prompt, the ticket still closes normally.
/close a habit for your team.
One-Click Moderation
Spam and abuse happen. SupportBuddy integrates a robust, one-click client blocking system to protect your support team and keep channels clean.
Banning a Client
If a user is sending spam, sending advertisements, or being abusive, you can ban them from using the support bot instantly. Choose between two methods:
- Inline Button Action: Every user details profile pinned at the top of a topic thread contains a button: [🚫 Ban User]. Simply tap it to ban them.
- Group Command: Type the command
/baninside the user's forum topic thread. The bot will automatically parse their mapped ID, block them, and reply with confirmation:"🚫 User has been banned by: Agent Name".
Once banned, the user will be blocked from sending any further messages to the bot. If they attempt to send a message, the bot will reply with a strict warning: "🚫 You have been banned from using the bot."
Unbanning a Client
To restore a blocked customer's access, choose between these options:
- Inline Button Action: Tap the updated inline button: [✅ Unban User] in their thread.
- Group Command: Type
/unbaninside their forum topic thread. The bot will unlock their account immediately, replying:"✅ User has been unbanned by: Agent Name".
Announcements Broadcast
Need to announce a product update, a system downtime warning, or a promotional offer? SupportBuddy features a secure, bulk-broadcasting engine allowing bot owners to mass-message all their support users at once.
How to Broadcast a Message
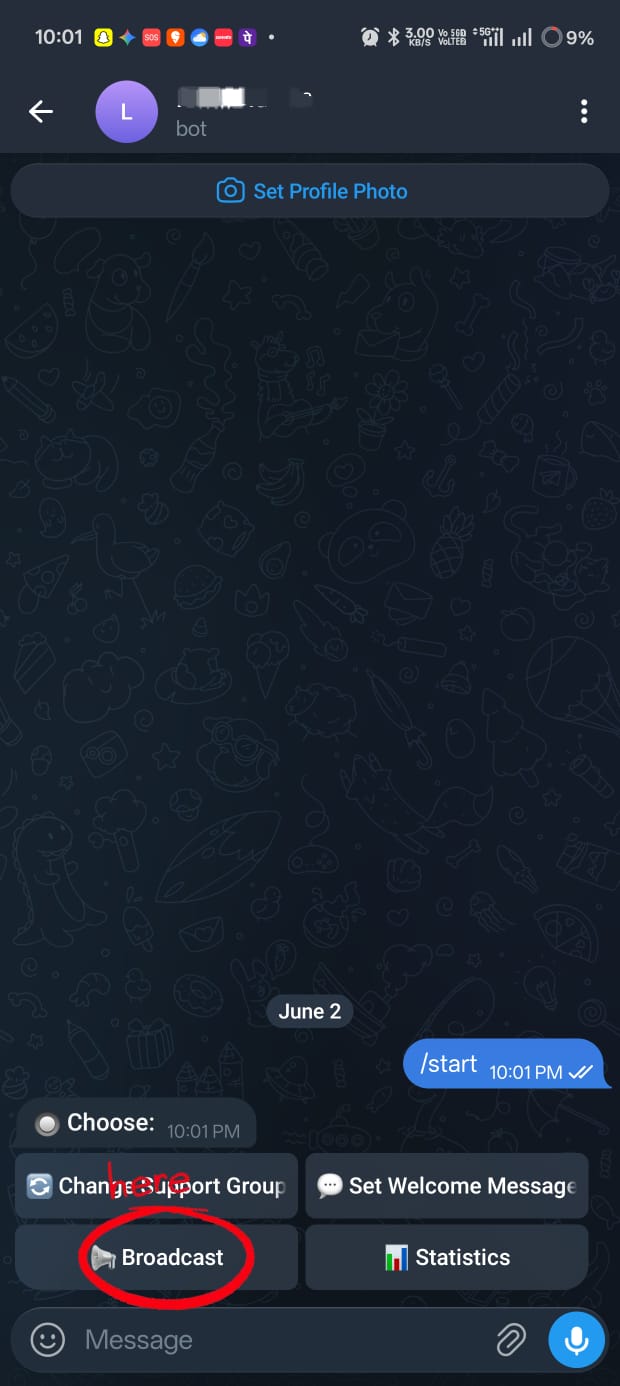
- Send
/startto your own support bot and tap 📢 Broadcast. - The bot will check your database, calculate your total active client base, and ask:
"📢 How many users would you like to broadcast this message to?". - Either tap 📩 Send to All Users, or send a number to target a subset (e.g.
500). The number must be lower than or equal to your total user count. - Send the styled announcement message (can contain text, images, bold formats, and buttons).
- Confirm the trigger when prompted:
"⚠️ Are you sure you want to broadcast this message?". Tap Yes.
Broadcast Summary Report
Once initiated, Weego Support Bot processes the broadcast in the background to avoid rate-limiting issues. Once completed, it dispatches a visual progress report to your admin chat:
📊 Broadcast Summary
✅📩 Message sent to 482 users.
❌ Error Count: 18.

Send /start to see bot buttons!
Automatic Blocked-User Cleanup
When a broadcast can't be delivered because a customer has blocked your bot or deleted their account, SupportBuddy marks them as unreachable and stops targeting them in future broadcasts. Temporary failures (rate limits, network hiccups) are counted as errors but leave the user eligible, so nobody is dropped by accident.
Analytics Dashboard
SupportBuddy ships with a full analytics dashboard that opens as a Telegram Mini App — a real, interactive dashboard with charts, running inside Telegram itself. No browser login, no external tool, no separate account.
Opening the Dashboard
Send /start to your own support bot and tap 📊 Statistics. The dashboard opens over your chat and matches your Telegram light/dark theme.
Every screen has a range switch at the top — 7d, 30d (default), or 90d — and four tabs: Overview, Audience, Tickets, and Team. Each chart also carries a data table underneath, so every figure is readable as plain numbers too.
Overview
Your daily pulse: unique users today, compared against the same weekday last week rather than yesterday, because support traffic has a strong weekly rhythm.
| Metric | What it tells you |
|---|---|
| Daily unique users | People who sent at least one message, plus a % change vs. the same weekday a week ago. |
| Messages today | Message volume today, with the total across the selected range. |
| Open tickets | Conversations still awaiting resolution right now. |
| Median first reply | How long a customer typically waits for the first human answer, across all agents. |
| CSAT | Average star rating out of 5, plus how many ratings it's based on. |
| New vs returning | First-time writers plotted against people coming back. |
Audience
Who your user base actually is, and how much of it you can still reach:
- Total users reached — everyone who has ever written to your bot, plus how many are new in the selected range.
- Audience composition — a breakdown of Active (last 30 days), Dormant, and Banned users.
- New users per day — first-ever messages, day by day.
- Reachable by broadcast — the percentage of your base that hasn't blocked the bot, and the raw blocked count.
Tickets
Workload and quality, in one screen:
- Open tickets, plus how many opened and closed within the range.
- Tickets opened per day — with closes shown alongside in the table.
- When your users write — a heatmap by weekday and hour. Staff your agents against the strongest cells.
- Top FAQs — your busiest auto-answers ranked by hits (range and all-time), headlined by your deflection rate: the share of all messages that got an instant answer.
- Rating distribution — how your 1★ to 5★ ratings split, so a 4.2 average with a spike of 1★ reviews can't hide.
Team
How your agents are performing — built from replies actually sent inside your support group's topics:
- Agent leaderboard — ranked by replies sent, each with their own first reply time, CSAT, and tickets handled.
- First reply time — the daily median trend; gaps are days with no answered tickets.
/close. Tickets that are never closed stay counted as open forever, and never trigger a rating request — so CSAT, resolution counts, and open-ticket totals only reflect reality if your team closes finished conversations. See Tickets & Ratings.
Text Summary Fallback
If the Mini App dashboard is unavailable, the 📊 Statistics button falls back to a plain text summary in chat:
📊 Bot Statistics

👥 Total users: 1,204

🆕 New users
  • Today: 18
  • Last 7 days: 96
  • Last 30 days: 342

⚡ Active users
  • Today: 57
  • Last 7 days: 289

😴 Dormant (30d+): 411
🚫 Banned: 6Owner Digest
Nobody opens a dashboard unprompted. The Owner Digest sends the numbers that matter — tickets, reply speed, ratings — straight into the chat you already read with @WeegoSupportBot, so you don't have to remember to go looking for them.
Turning It On
- In
@WeegoSupportBot, open your bot's Settings menu and tap 📬 Digest. - Tap ⚪ Disabled (tap to turn on) to enable it — it becomes 🟢 Enabled (tap to turn off).
- Tap 🔁 Frequency to cycle through Daily → Weekly → Monthly.
- If you're on Weekly, a 📅 Day button appears so you can pick which day of the week it lands (daily and monthly digests don't need this — monthly always sends on the 1st).
- Tap 🕗 Time to cycle through send-time presets. The digest follows the timezone already set in your Working Hours.
- Tap 👀 Preview at any point to see exactly what a delivered digest looks like, built from your bot's real numbers.
📊 Your week on @YourSupportBot
28 Jul – 3 Aug

🎟 42 tickets opened (+18% on the previous week)
✅ 37 closed · 🔵 5 still open
⚡ First reply, median 4m
⭐ 4.8★ average from 21 ratings
👥 63 wrote in, 12 of them new
🏅 Busiest agent: Agent Name, 22 replies

Sent every Sunday. Change or stop it in Settings.
How Each Cadence Behaves
- Daily: reports the last 24 hours against the day before. Sent every day at your chosen time.
- Weekly: reports the last 7 days against the 7 days before that. Sent on your chosen day and time.
- Monthly: reports the last 30 days against the prior 30. Always sent on the 1st, at your chosen time.
Turning It Off
Every delivered digest carries its own 🔕 Turn off digest button, so you can stop it in one tap straight from the message — no need to dig back into Settings. You can always switch it back on later from the 📬 Digest menu.
Managing Your Bots
You can run as many support bots as you like from one account — one per brand, product, or language. Two different chats control them, and it's worth knowing which does what.
| Where | What it controls |
|---|---|
| @WeegoSupportBot (the master bot) |
Creating new bots, listing the bots you own, deleting bots, buying Premium. |
| Your own support bot (as its owner) |
Support group, welcome message, FAQs, broadcasts, statistics. |
Listing Your Bots
In @WeegoSupportBot, tap 📂 My Bots or send /mybots. Pick a bot to see its details:
🤖 Bot Details:

🆔 Bot ID: 7563482769
📛 Username: @YourSupportBot
💬 Support Group ID: -1002345678901
Adding Another Bot
Tap 🤖 Create Support Bot (or send /createbot) and paste a fresh token from @BotFather. A token that's already registered is rejected with "🚫 Bot is already added.", and an invalid token with "⚠️ Please enter a valid bot token to proceed." Each bot needs its own forum group.
Deleting / Dumping a Bot
Open 📂 My Bots ➔ select the bot ➔ 🗑️ Delete/Dump Bot, then confirm with ✅ Yes, Delete.
Getting Help
Send /help or /support in the master bot or any of your own bots to get 📞 Contact Admin and 📖 Docs buttons. /doc or /docs opens this documentation directly inside Telegram.
Command Reference
Every command SupportBuddy understands, grouped by who runs it and where.
Master Bot — @WeegoSupportBot
| Command | What it does |
|---|---|
/start |
Opens the main menu: Create Support Bot, My Bots, Help, Buy Premium. |
/createbot |
Registers a new support bot from a BotFather token. |
/mybots |
Lists every support bot you own. |
/premium |
Shows premium plans and upgrade options. |
/help · /support |
Contact the admin, with a link to these docs. |
/doc · /docs |
Opens this documentation inside Telegram. |
Your Own Support Bot — as the owner
| Command | What it does |
|---|---|
/start |
Opens your control panel: Change Support Group, Set Welcome Message, Manage FAQs, Broadcast, Statistics. |
/help · /support |
Contact the admin, with a link to these docs. |
/doc · /docs |
Opens this documentation inside Telegram. |
Your Own Support Bot — as a customer
| Command | What it does |
|---|---|
/start |
Starts a support session and creates the customer's forum topic in your group. |
/help · /support |
Shows support contact instructions. |
Support Group — agents, inside a ticket topic
| Command | What it does |
|---|---|
/close |
Closes the ticket in this topic and asks the customer to rate it 1-5. Their next message opens a new ticket. |
/ban |
Bans the customer this topic belongs to. |
/unban |
Lifts the ban on the customer this topic belongs to. |